Solstice Seedlings

We are a a little over a week away from the winter solstice. The year has wrung about as much light out of the day as it can, and we have mere minutes left to lose until we hit the shortest day of 2022.

It’s in this solstice season that I start planning in earnest for next year. With the semester over, the growing season ended, and the new year on the horizon I have time to consider the goals and projects I want to move forward in the coming year.

The plants in my garden are preparing for next year, especially those whose growth culminates in spring. Even though March is months away, amongst the duff there are hints of the next growing season starting to appear. Every day harnessing the sun counts in the march toward warmer weather for making sugars that will become more blades and blooms.

I’ve spied the lobed foliage of Delphinium carolinianum (prairie larkspur) and Viola pedata (birds-foot violet) in the garden. The maroon leaves of Claytonia virginica (spring beauty) no longer hide amongst the tawny, frosted turf. I even found two with open flowers in our backyard this week. The little toothpick leaves of Phlox pilosa (prairie phlox) are emerging. And, the first of my perennial sowings from this year are germinating.  

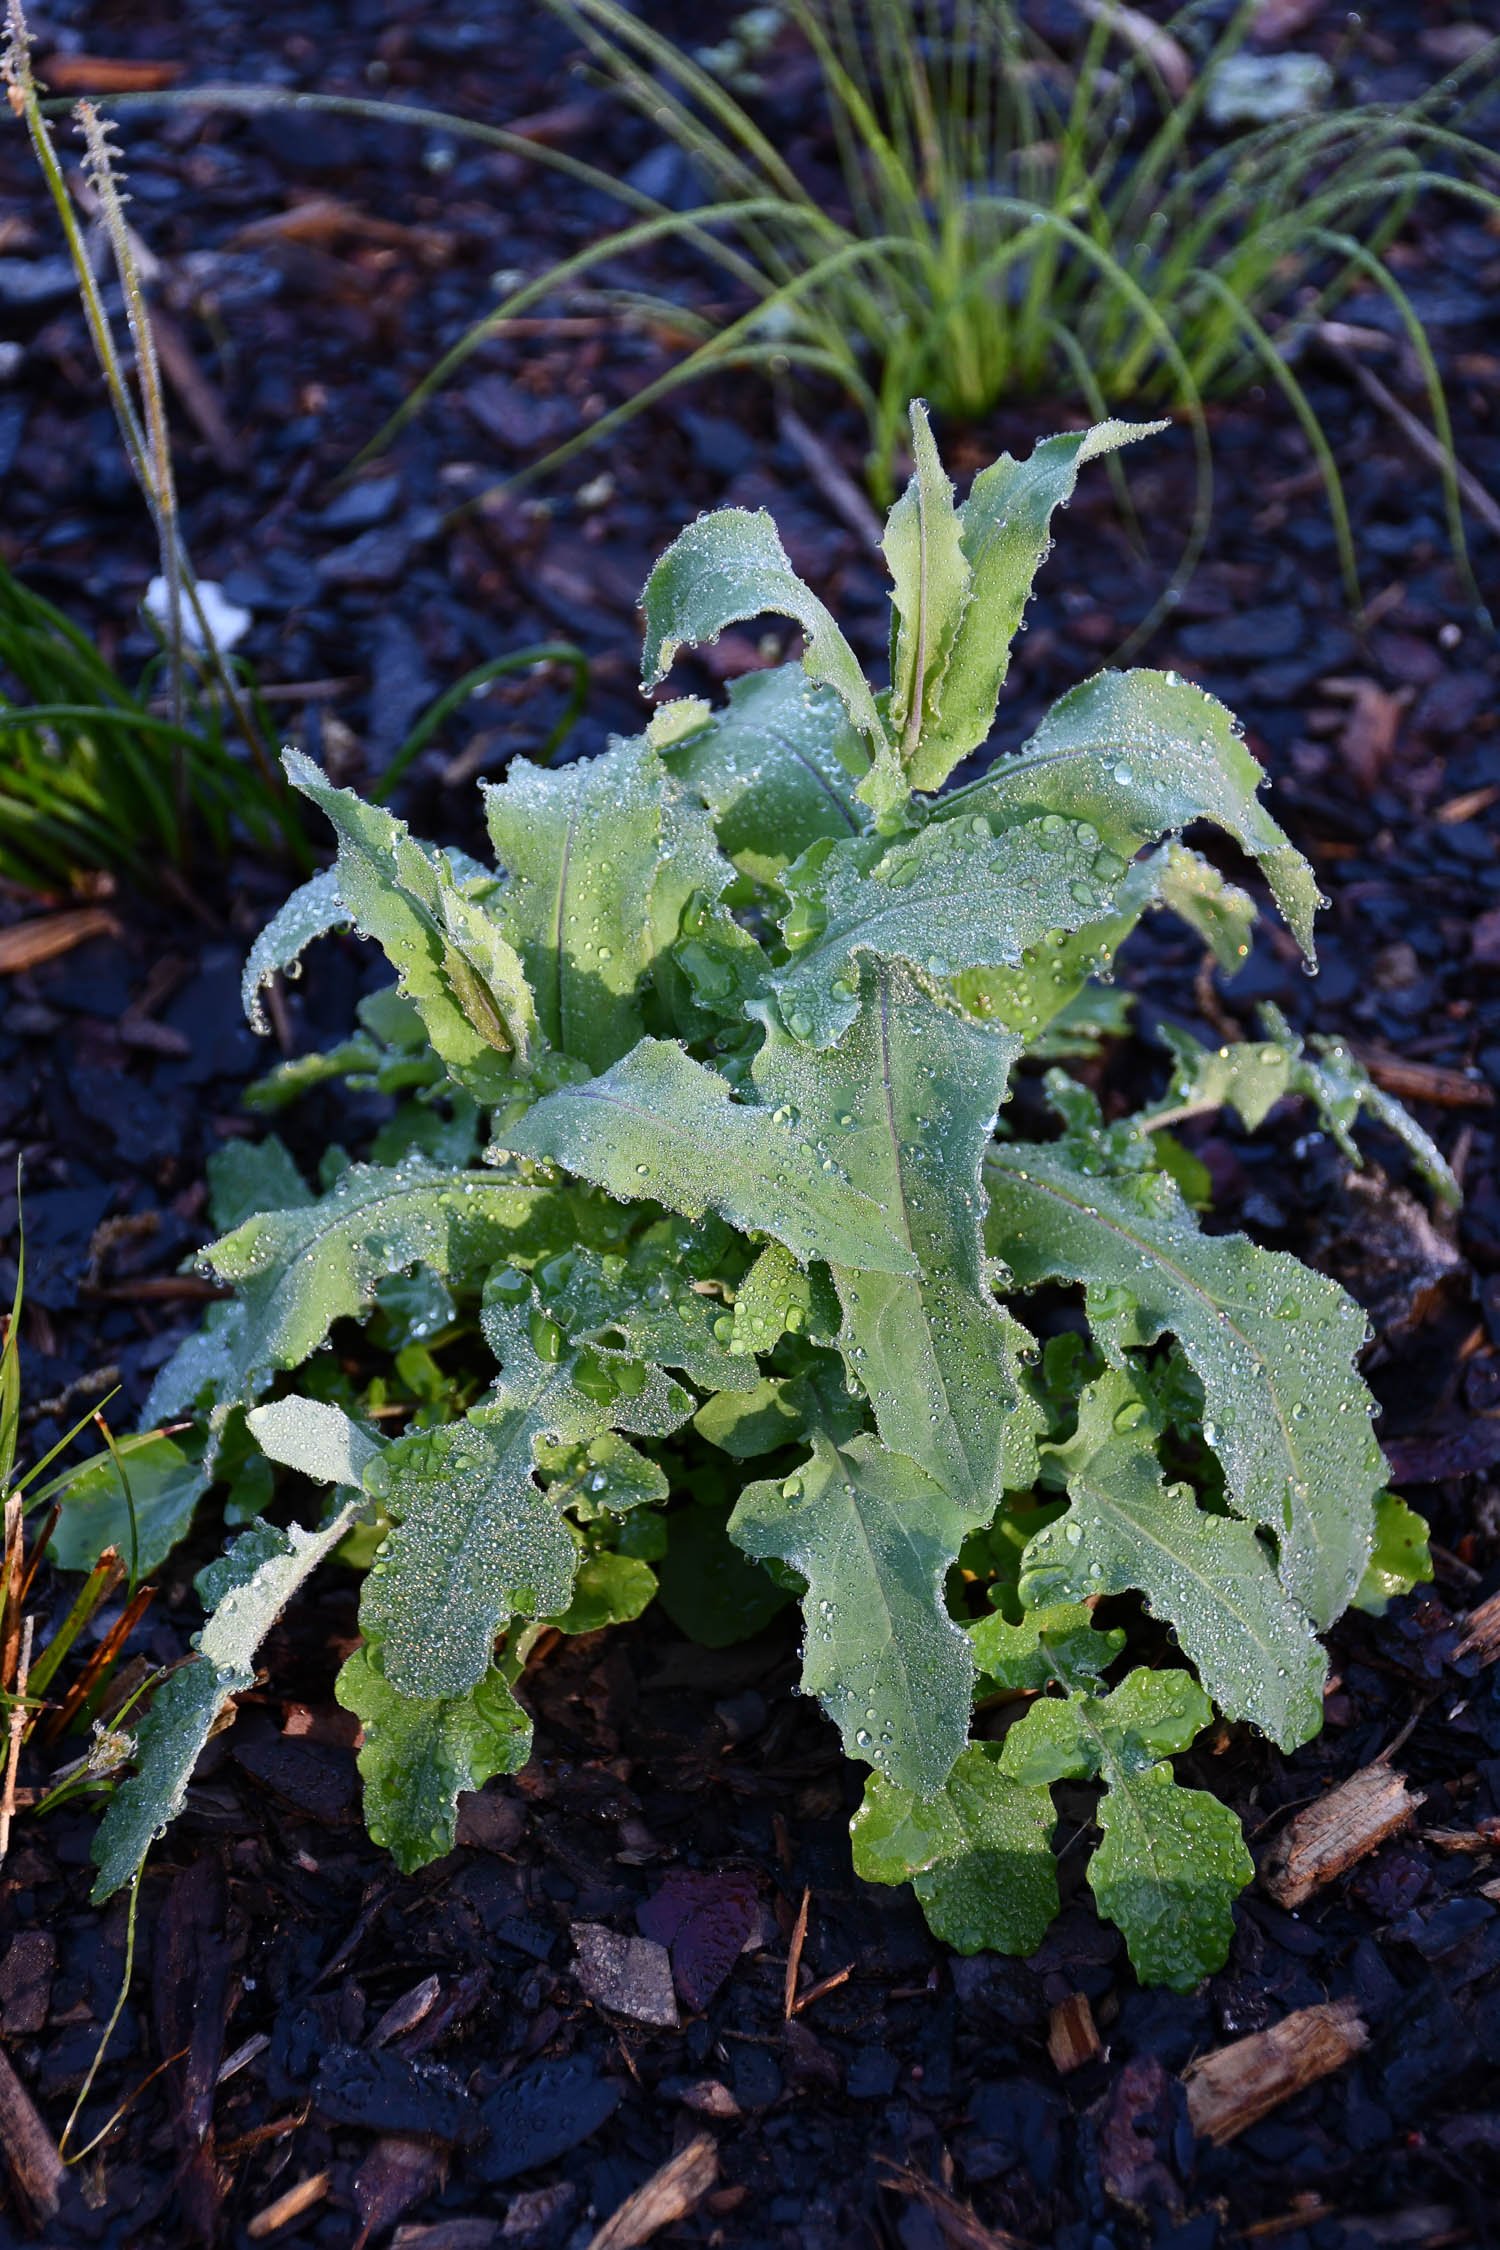
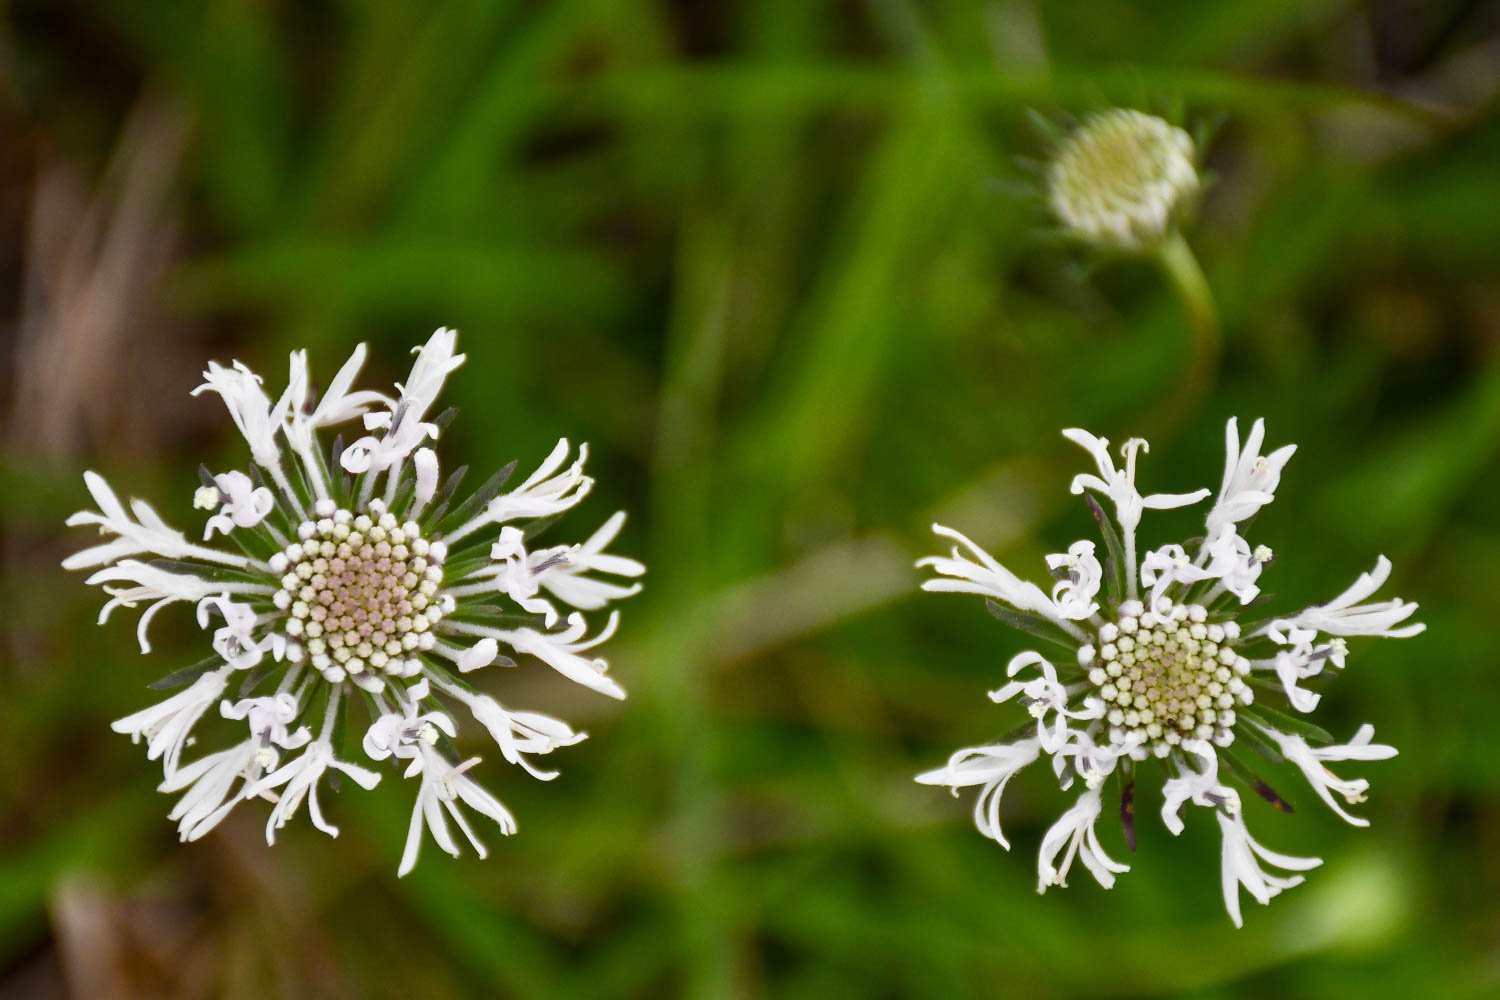
Late last spring, I sowed Marshallia caespitosa (Barbara’s buttons) and Callirhoe alcaeoides (white poppy mallow) from seed collected in my garden.  I love both for their white flowers and desired more as they are good fillers for spring color. Callirhoe has this ability to thread itself through the matrix of foliage, and looking down on a Marshallia is like looking up at a galaxy. Both go dormant in my garden soon after they flower and set seed.

I decided instead of letting the progeny sit in storage in the fridge, I would promptly sow them and put them on my small nursery pad where they would receive occasional irrigation over the summer. Often with the first time sowing a batch of seed, I will sprinkle them on potting substrate in a gallon pot, trust mother nature, and watch and learn for next time. Both seem quite happy with this approach thus far.

Marshallia caespitosa

Callirhoe alcaeoides

Marshallia caespitosa seedlings

Callirhoe alcaeoides seedlings

Even though they got water all summer long, their emergence coincided with the return of cooler weather this autumn. Like many native perennial seeds, the delay makes sense to wait and start growth when conditions are more appropriate. The Callirhoe germinated fast while the Marshallia were more staggered.

Towards spring I’ll tease them apart and pot on into trays to allow each plant to have space to grow.  And, then once they’ve bulked up a bit, I’ll welcome these plants into the garden.

I suppose in retrospect my planning for 2023 started earlier in the year than just here at the end. Every seed I sowed in anticipation of having more plants for next year is hope and planning for greater things to come. Their appearance is yet another thing to celebrate in this solstice season.

Direct Sowing the Fall Garden

I’ve always thought of August as the start of a new year. While I suppose that living on a school calendar for some thirty years has engrained that into me, there’s more to that feeling than just the return of classes. Change is in the air. Summer is waning, and the days are palpably getting shorter. It’s time to begin planting the fall vegetable garden. As a young gardener who experimented around with season extension, I realized that the crops that I was sowing now would live on into the spring. And, that really to begin planning next year’s garden I had to begin in late summer. It was often time to start clearing out warm-season crops that were finishing up their production anyway. So, yes, it does have the feel of a new chapter beginning.

For us in east Texas, there’s about 90 days left until our first frost, so plantings are usually intense for a month trying to get everything started and in the ground to be able to overwinter. I typically start direct seeding in late August, so I thought I would share some techniques and cultivars that I’ll be direct sowing over the next few weeks.

Mustard and Collard greens

Even though mustard and collards are separate species, I’ve grouped them together because I start sowing these greens in late August. Growing mustard greens were a Tennessee tradition for our family. I hated them at first, but once I planted them in my own garden, I quickly gained a taste for this classic southern crop.

Collards came to me later in life. I first tasted collards at the Old Salem Tavern in Old Salem, NC. They tasted delicious flavored with bacon drippings and brown sugar, so delicious that I added them to my fall rotation.

I try to time my seed sowing with a good pop up summer thunderstorm or tropical storm moving through. But, those rain events are too often unreliable, so I set sprinklers up for a week to help seeds stay moist. To evenly disperse the seeds over the growing bed, I have mixed seed with sand and then broadcasted across the bed in a criss-cross pattern. But, planting them in rows allows for easier cultivation between the plants. So, the decision is yours based on the space you have available. In either case plants live all the way through the winter here in zone 8 with yellow cruciform blossoms emerging in the spring.

You’ll hear people say let the plants experience a frost for better flavor, and there is some truth to that. Plants increase the soluble sugar in their foliage when exposed to cold temperatures, which lowers the freezing point and acts as a natural antifreeze. After harvesting, I follow my Granny’s practice of tossing the midribs and soaking the remaining foliage in salt water to rid of any pests that might still be hiding amongst the leaves.

For mustard greens, I like the classic cultivars like ‘Tendergreen’ and ‘Florida Broadleaf’. There are also ornamental mustards. ‘Red Giant’ turns a beautiful violet, ‘Magma’ has chartreuse curls and is blushed rose, and ‘Tokyo Bekana’ has a golden hue to it.  

‘Magma’ mustard erupts in the fall with blushed leaves and chartreuse curls.

‘Magma’ mustard erupts in the fall with blushed leaves and chartreuse curls.

For collards, definitely check out The Heirloom Collards Project for old time varieties. ‘Alabama Blue’ has lovely steel blue foliage with purple petioles. ‘Variegated’ is another fun cultivar to grow because some individuals in the population will have green and white leaves.  

 
One year, I had ‘Alabama Blue’ collards seed into some tall grass.  I could identify it by its purple petioles.

One year, I had ‘Alabama Blue’ collards seed into some tall grass. I could identify it by its purple petioles.


Peas

Peas were another crop that I hated until I grew it. The truth is I didn’t know what a good pea was. Most of the peas I had from the store were very mealy and had a horrible texture. But, one year on a whim, I tried some English peas from our Sprout garden, and I was blown away by the flavor. They were as sweet as candy.

Since then, I have dedicated a couple beds at home to growing peas both in the fall and the spring. I struggled with seed germination until I realized that my plants were succumbing to a fungal wilt. Since then I have only grown disease resistant varieties like ‘PLS 595’ and ‘PLS 141’.  I should add that I sow the seed densely. It seems counter-intuitive to space them close and not thin them, but the recommendation has worked thus far.

While I have used sapling stakes, I have appreciated the consistency with nylon support held by a T-post and electrical conduit frame. The conduit is fed through PVC T-joints that rest on top of posts. The vines are rambunctious growing towards the low sun; thus, I run cotton twine every foot or so to help encourage them to climb their trellis. They will tank with the first frost, but I rip them out and plant something cold tolerant like spinach in their wake.


Carrots

There is nothing like a fall grown carrot. Seed sown in early September will be ready around early November, but if you let them sit in the soil for another month or two, they will sweeten, again due to sugar acting as a natural antifreeze. That’s a trick I learned from Eliot Coleman, and while we don’t experience quite the extended cold they do further north, I still notice a different between fall and spring carrot flavor.

When sowing seed in late August/early September, moisture is crucial. The seeds have to be watered well every day for six days.  SIX DAYS. I cannot stress that enough in the south. To aid in moisture retention, I will often cover them with floating row cover and check daily for any sign of emergence on the seed. Note that as you sow later into fall, the time to harvest increases. Carrots sown in late November will be ready to harvest 3-to-4 months later.

My favorite cultivars include the orange ‘Napoli’, the crimson ‘Atomic Red’, the violet with orange center ‘Purple Haze’ (although seed has been hard to find of late), and the creme-amber-tangerine mix ‘Rainbow’.

 
Floating row cover held down by T-posts is an effective cover for reducing water evaporation from the soil to aid in carrot seed germination.

Floating row cover held down by T-posts is an effective cover for reducing water evaporation from the soil to aid in carrot seed germination.


I’m super excited to welcome the fall garden back into production. Best of luck direct sowing seed for these crops this fall, and happy new year for all you cool-season gardening aficionados!

Carex cherokeensis, Cherokee sedge

Ever since I learned of the concept of matrix species from Noel Kingsbury and Piet Oudolf’s book Planting: A New Perspective I have searched for and evaluated good ground covering plants for the southeast.  One that I have enjoyed getting to know better is Carex cherokeensis or Cherokee sedge.  

 
A snapshot of Carex cherokeensis in our modest grass and Carex trial at the Plantery at Stephen F. Austin State University.

A snapshot of Carex cherokeensis in our modest grass and Carex trial at the Plantery at Stephen F. Austin State University.


I first learned about this species when the Plantery conducted an informal trial of grasses and sedges at SFASU thanks to the help from the fine folks at Hoffman Nursery in Rougemont, NC.  Carex cherokeensis showed us it was a stalwart for east Texas.  In my naiveté, I didn’t realize it was native to our area until I found it growing along a roadside west of town.  And, then imagine my delight when I found three plants in a wet spot of my yard this past winter.  I chuckle when I think that we ordered plants from halfway across the country, and they were growing in my own backyard (literally!)

While the inflorescences are not very showy, closer inspection reveals there is a beauty to the dainty seedheads of Carex cherokeensis.

While the inflorescences are not very showy, closer inspection reveals there is a beauty to the dainty seedheads of Carex cherokeensis.

So, why do I like this living mulch?  For a variety of reasons.  The verdant foliage livens a dappled understory, and it tolerates full sun conditions like a champ with little burning.  It was also tolerate most soils save for those with heavy sand. From my encounters with Cherokee sedge in the wild, I noticed that it tends to occur as small, almost solo crowns. However, plant it in a bed, and it will form a nice cespitose clump.  It may sit there for a year, but be patient, and let it get established.  The inflorescences are not too conspicuous. They resemble inverted wheat ears and hang like thin beaded earrings above the foliage.  We do remove the whole peduncle after the seed have dropped. 

A mass of Carex cherokeensis

A mass of Carex cherokeensis

The students used this Carex in our food prairies in the Sprout garden, and we have slowly watched over the past three years as it has colonized open spaces with rhizome and seed.  We mow it once a year in early January when we cut back our plantings to prepare for spring bulbs to emerge. It divides well, too.  I regularly have students divide a few plants early in the semester for a primer on division and then use it in later exercises on grading propagule sizes.   

This past year, I tried propagating it from seed at home.  I collected seed from my Texas germplasm last spring and stratified it for a couple months.  I sowed it in a flat outdoors last fall and waited.  After a few weeks, I noticed a couple of green slivers popping up out of the soil but only a few.  At first I wondered what I did wrong and why more weren’t germinating.  Later, I saw that the tray had more, and eventually I came to realize that it seemed as if a few new ones were germinating each month.  

Grading Carex cherokeensis seedlings at my house.  These were large enough to pot on.

Grading Carex cherokeensis seedlings at my house. These were large enough to pot on.

The rest were allowed to remain in the tray to bulk up.  Again, notice how some are barely up while others have some size to them.

The rest were allowed to remain in the tray to bulk up. Again, notice how some are barely up while others have some size to them.

I’m not sure if it’s an effect of my sowing efforts or the plant’s staggered germination biology.  Either way, I’m happy to have about 50 more plants to add to my landscape of this great Carex species.  

Hey, Sarracenia, I like your style

I learned how Sarracenia pollinate this week!  Some of my pitcher plants are flowering, and I text Jevon, one of my students who is keen on carnivorous plants, to help me understand what to do since I wanted to make some crosses in my collection.  He told me that the cap that shields the pollen is actually a modified style and has stigmas on the tips.  Bees enter the flower through entrances on the style platform where pollen drops, and before they leave they would brush against one of the five stigma, hopefully carrying pollen from a previous individual.  Boom, cross pollination occurs.  It’s a brilliant approach to help prevent self pollination.  I think the stigmas curled up and away from the pollen-loaded stamen helps even more.  

The appendage I’m grasping is part of the style on this Sarracenia alata. The white spot near my thumb is the stigma where I’ve just placed some pollen from Sarracenia × areolata. There are five stigmas, and I applied pollen to all five in hopes of …

The appendage I’m grasping is part of the style on this Sarracenia alata. The white spot near my thumb is the stigma where I’ve just placed some pollen from Sarracenia × areolata. There are five stigmas, and I applied pollen to all five in hopes of getting seed set.

I was blown away.  In all this I realized I had never seen a pitcher plant in flower before with the draped petals, and thus never really had a chance to process the floral mechanisms.  It’s always nice as a professor when the student becomes the teacher.  


Sowing Perennial Seeds

With the arrival of February and warmer temperatures, I've been sowing seeds in earnest this week, perennials in particular.  Seeds purchased or collected last year have the chance to sprout.  My goal is to get them started for easy propagation in years to come for planting prairies here at the house.  

Two species that I've had stratifying—a cool moist period to enhance germination in some species—in the refrigerator are Asclepias tuberosa 'Wild Orange' and Echinacea sanguinea.  I've checked on them weekly in the little baggies by opening the moist paper towels and inspecting them.  It's a nice way to also introduce some fresh air in the sealed vessels since seeds need oxygen for germination.  For the Asclepias, I noticed swelling in the seeds and some rupturing of the seed coat, a clear indication they were ready for planting.  The Echinacea seed held onto their dingy off-white color while the other detritus from the seed head turned black.  

Plump Asclepias tuberosa seeds. Seed the tinge of light yellow? The seed coat has ruptured on one near the center.

Plump Asclepias tuberosa seeds. Seed the tinge of light yellow? The seed coat has ruptured on one near the center.

Echinacea sanguinea seed were mixed in with parts of the flower head. I decided to stratify them together and pull the seeds out when sowing.

Echinacea sanguinea seed were mixed in with parts of the flower head. I decided to stratify them together and pull the seeds out when sowing.

These made their way into seed trays earlier this week.  With the Asclepias I was sure to sow the seeds in a tray deep enough (approximately 5–6 inches) to allow their roots to grow down.  Allen Bush shared with me that shallow trays can cause their demise because the root doesn't have enough room to grow down.  

Along with the seeds that have been chilling in the fridge, I also scarified some seed this week and allowed them to soak for a couple of nights to prep for planting.  Scarification damages the seed coat and allows water to enter.

Last August, I collected some Baptisia sphaerocarpa seed from a location I saw it blooming several years prior.  Fingernail clippers make quick work breaking the seed coat on a few seeds.  

A few roots began to appear on Baptisia sphaerocarpa.

A few roots began to appear on Baptisia sphaerocarpa.

Another species that I scarified was Amsonia tabernaemontana.  The seed came from my dad.  Years ago, I found an Amsonia blooming on the roadside near home.  The fear that it would succumb to the mower or herbicide like I had witnessed happen to many other plants inspired me to relocate the clump to our yard.  It settled in nicely and started producing seed.  A year or two ago, I asked my dad to collect any fruit he saw, and that Christmas I returned home to find the baggie on the windowsill.  Now that I have a house of my own, I felt it time to try growing the northern provenance here.  The germination requirements were unknown to me; however, from a quick google search, I discovered researchers at UGA demonstrated that clipping the end of the seed would allow moisture in to kickstart the germination process.  

Amsonia tabernaemontana seedlings emerged from an intriguing cigar-shaped seed. With the embryos popping out, they look like sea tube worms.

Amsonia tabernaemontana seedlings emerged from an intriguing cigar-shaped seed. With the embryos popping out, they look like sea tube worms.

Today the seeds are in the garage instead of their cold frame.  The forecast showed below freezing last night, and I didn't want to take any chances since I've worked hard to get them all started.  Here’s to hoping they all germinate!


An Auger, The Best Purchase of 2018

One of the best purchases I made last year was an auger that I could attach to a cordless drill, a thought that hit me as I was dividing abandoned ‘Grand Primo’ Narcissus I discovered on an abandoned backroad.  Two clumps became 107 bulbs in a matter of minutes, and I wanted to get them in the ground as soon as possible. The auger and drill came out, and the task was completed in under an hour.

Narcissus tazetta ‘Grand Primo’ is one of the few Narcissus that is very persistent in the deep south. Scapes are adorned with over half a dozen petticoat-shaped flowers. Note other attributes like bright orange pollen and the corona that fades from…

Narcissus tazetta ‘Grand Primo’ is one of the few Narcissus that is very persistent in the deep south. Scapes are adorned with over half a dozen petticoat-shaped flowers. Note other attributes like bright orange pollen and the corona that fades from butter yellow to off-white over time.

The ingenious idea was from Thomas Rainer.  We both were presenting at the Speaking of Gardening event in Asheville two years ago, and he mentioned getting one for planting the deep-rooted landscape plugs.

Several months later, I remembered browsing Amazon one night to purchase the thing.  When it came, I tried it out, and I was immediately impressed.  As someone who suffers from carpal tunnel in my wrists, using a trowel over and over again leaves my hand in pain after planting.  Now, I hook the auger up to a cordless drill, zip zip zip, and I’m ready to plant 50 plugs! I find that even the three-inch pot size will easily fit into a shallow excavated hole.

We bought one for school, and the students immediately fell in love with it, too.  I also convinced my parents to get one for planting bulbs.  

The biggest problem I encounter using the auger is roots.  In plain soil, it will go down without a problem, but roots often cause it to jerk around or just stop.  Also, safety note:  I find it best to hold it with both hands.  If you’re concerned about it whipping on you, get one of the two-handled drills.  I would especially recommend that option if you use a corded drill.

I know many advise dividing Narcissus once dormant, but I’ve had success moving them in the green. In this image you can see the circular holes made by the auger and my attempts to get the bulbs to the same depth. After sticking them in the hole, I …

I know many advise dividing Narcissus once dormant, but I’ve had success moving them in the green. In this image you can see the circular holes made by the auger and my attempts to get the bulbs to the same depth. After sticking them in the hole, I use a hoe to replace the soil back.