“How did I get here?” I asked myself in anxious jubilation last Friday as I watched the dump truck release its load of 6 cubic yards of gravel behind the agriculture building. The driver, a super nice guy named Mike, wished us luck on planting our gravel garden as he drove off. He had never heard of growing plants in gravel. And, up until a few years ago, really neither had I.
But, the rhetorical question really made me reflect. Why was I having students plant common perennials in gravel?
Every two years I teach Herbaceous Plants, a class devoted to the annuals and perennials that will do well in east Texas and the southeast. This semester is the fourth time that I have taught the class, and each year I get a little more focused on the use of these plants in naturalistic design. In the past years, I’ve had students design and plant prototype designed plant communities in our edible garden. We deemed these food prairies since the garden was centered on food for people, and these plantings would provide food for insects. They would also provide food for the mind where the students and I could learn better how to do this sustainable type of planting.
Through the installation of naturalistic plantings, I’ve realized that the weed management is a constant struggle. While weeds are already a challenge during the active growing season, they are also problematic during the cooler months here in the southeast when the weather is mild enough to allow persnickety winter weeds to continue growing. The hope with naturalistic plantings is that they can close quickly enough to choke out potential weeds, and if the weed bank is depleted prior, it certainly helps. But, management often requires the use of mulch, pre-emergent herbicides, and/or wedding to control such issues. Other friends and colleagues have commented on their frustration that weed management after installation can be quite cumbersome especially with the dense planting used.
A Permanent Mulch
In my studies of naturalistic design, I’ve learned that weed management can be induced by increasing the stress of the site conditions and by lowering the level of nitrogen in the soil. An inorganic mulch layer of gravel, sand, recycled concrete, or other crushed aggregates achieves both of these goals. I first became aware of the science behind this approach when I heard Cassian Schmidt speak at the 2016 Perennial Plant Conference. He had detailed data down to minutes per square meter on how much management must occur for different types of plantings, and rocky soils that create more stressful conditions for the plants reduce management time. I realized I had seen these types of plantings before. I had visited Beth Chatto’s gravel garden in England where famously none of the plants have been irrigated. And, of course the gravel garden at Chanticleer has always captured my attention.

The gravel garden at Beth Chatto’s nursery in the UK was once a parking lot. It now features denizens from around the world that survive in more stressful conditions.

The gravel garden at Chanticleer hosts a wide range of species that tolerate growing in harsher conditions.
Hearing Cassian Schmidt’s presentation really piqued my interest in using gravel as a planting medium, but I had my doubts. I really hadn’t embraced that stress was an asset yet as I had studied about emulating nature in the other direction and enriching soils with organic matter to prevent problems with edibles. I started to think about the plant communities I had seen in west Texas or the North Carolina barrens. Perhaps it was possible, and we could make garden soil more stressful for plants.
I started looking for more information on the subject. I learned about Peter Korn and how he grows plants in straight sand conditions, and again, I was amazed that plants could survive in such a scenario. In 2019, I attended the Perennial Plant Association’s (PPA) meeting in Chicago, and on a tour visited Olbrich Botanical Gardens where Jeff Epping is director of horticulture. Right off the bus was an incredible perennial planting at the entrance. I would discover from the conversations of the people around me that the thriving plants I saw were planted in 4 to 5 inches of gravel! Once inside, we would discover other gravel plantings where Jeff had overseen their install. I’ll add here that I’ve learned much from looking at a presentation he gave at PPA in 2017.

Perennials thrive in a gravel garden at the entrance to Olbrich Botanical Gardens.

Here’s another gravel garden further in Olbrich Botanic Gardens that features Calamintha, Sporobolus, Allium, and other species.
Around the same time, I was delighted to see Ben O’Brien have success with planting in combinations of sand, gravel, and recycled concrete in Canada. He did some incredible trials of different species in these mixed aggregates, and the complete results of his work including a species-by-species breakdown of his trial can be found on his website.
HOW WELL DO GRAVEL GARDENS WORK IN THE SOUTH?
But, most of these plantings are found up north—Wisconsin, Pennsylvania, Ontario, England, Germany, and Sweden. The question is will they work in the deep south where we get quite hot later in the summer and can have prolonged dry periods. And, again I’m not focusing on xeric or alpine plants but instead common perennials to grow in gravel.
So, I decided with my class this year that we would install a gravel garden to attempt to answer this question. This class would be slightly different because due to COVID-19 we condensed the class from16 weeks down to a half semester of 8 weeks. We would just double the time we met each week to cover the same material. But, that also meant we had to expedite the process of developing the garden.
I should also note for those of you concerned about my students or me in a COVID-19 environment that I have been extremely cautious. (I’m that cautious person who hasn’t eaten out in a restaurant since March 2020, hasn’t travelled to see family or really anywhere, and was told back last spring when I was rearranging my classes that I “drank the Kool-Aid” about the hyped-up concerns over COVID-19.) There were only seven students in the class, which allowed for social distancing through this entire course, and students wore masks as well, too.

Here is the site of our future gravel garden at the bottom of Sprout, our edible garden in the Plantery. The Plantery is our teaching gardens, grow houses, and micro-farm Sprout located near the SFA Agriculture building where we can provide students with hands-on learning opportunities.
Prior to installing the garden, I covered many of the basics of naturalistic design from competitor—stress-tolerator—ruderal survival strategies to Nigel Dunnett’s FLOW design method in class. Students easily understood Nigel’s classifications of anchors (primary plants in the installation), satellites (plants that provide seasonality around the anchors), matrix species (the groundcover species, typically grasses), and free floaters (self sowers that pop up here and there). We then practiced iterating and creating naturalistic plantings, first as students in small groups and then as solo projects.
For our gravel garden, I provided students with a plant list of species that we had both ordered and propagated. Normally, we would choose the plants early in class and then order them or grow them, but the shortened semester forced my hand. I also provided students with a rendering of the site dimensions where the students were able to apply what they learned in class, and from a measuring lab we determined that the full sun site was approximately 400 square feet in size. Below are two anonymous examples of the drawings that students developed for the class.


From these drawings I then synthesized them into one cohesive design. Again, normally, we would do this activity in class, but with the time limitations I decided to render the design myself. The design we went with was to have taller edge species at the back of the planting near the fence that my nursery management lab had built the previous fall. Then, a sinuous curve would snake through the bed with plant anchors and plant satellites arranged on either side of the bed. Some large rocks remained in the bed from a previous planting that students like to sit on and take pictures, and we decided to just use them as part of the design. The taller species would provide a nice floral backdrop and the pathway would pass right by these larger stones.

The biggest challenge was sourcing the mineral mulch. I had almost given up when I found a company in town that sold baked clay that is used on roads, and it appeared to be clean of weeds, had the angular size of grit that we desired, and had that gray-blue color that I had seen before at other gardens. It was a bit pricey coming in a $110 a cubic yard, but I was prepared to pay for good quality material. This gravel was delivered last Friday in anticipation of planting this week.
TUESDAY MORNING CLASS, SPREADING THE GRAVEL
We finished leveling the soil in our morning class. We then put stakes in that had two markings, one for the soil line and one for the gravel line. Students then began to spread at least 4 inches of gravel over the entire site. We then went back and checked with trowels to make sure that the gravel depth was right over the bed.

A view of the site from the ground prior to any gravel. Oh, and in case you’re curious about the white in the Sprout garden, those are floating row covers over tomatoes. We had a freeze forecasted this week!

Students begin spreading gravel over the site.

The stakes really helped us check the gravel depth.
TUESDAY AFTERNOON LAB, PLANTING THE ANCHORS AND SATELLITES
In the afternoon lab, we flagged our pathway and then began placing the the anchors and satellite species into the bed. I paired students off to look at the design and then place plants appropriately with notes on how many plants should be placed in each area. From reading about gravel gardens I was aware that we needed to knock off excess soil to decrease the organic matter in the bed and remove the top of the substrate from the rootballs to reduce the weed load we might be putting in the beds. So, when we began planting, I instructed students to use Tubtrugs to accomplish these tasks and not get soil in the gravel. Afterwards, we watered the plants in well.

Students begin setting out plants based on the design.

Mike and Hanna check the design for the placement of Symphyotrichum oblongifolium ‘Raydon’s Favorite’.
The anchors and satellites laid out prior to planting.

Brendan plants a Pycnanthemum tenuifolium into gravel.

Nyree knocks the soil off a Pycnanthemum tenuifolium plant.

Hope waters the plants in after planting.

The anchors and satellites planted into gravel.
THURSDAY MORNING CLASS, PLANTING THE MATRIX
We wrapped up the planting Thursday morning by planting the matrix species. We planted more Nassella, and then we introduced a few Sporobolus heterolepis in the front and Muhlenbergia reverchonii in the back. We also scattered Echinacea purpurea and Echinacea purpurea ‘White Swan’ through the latter last two grasses to see how they will do on site as self sowers.

Planting round two begins with installing the matrix layer.

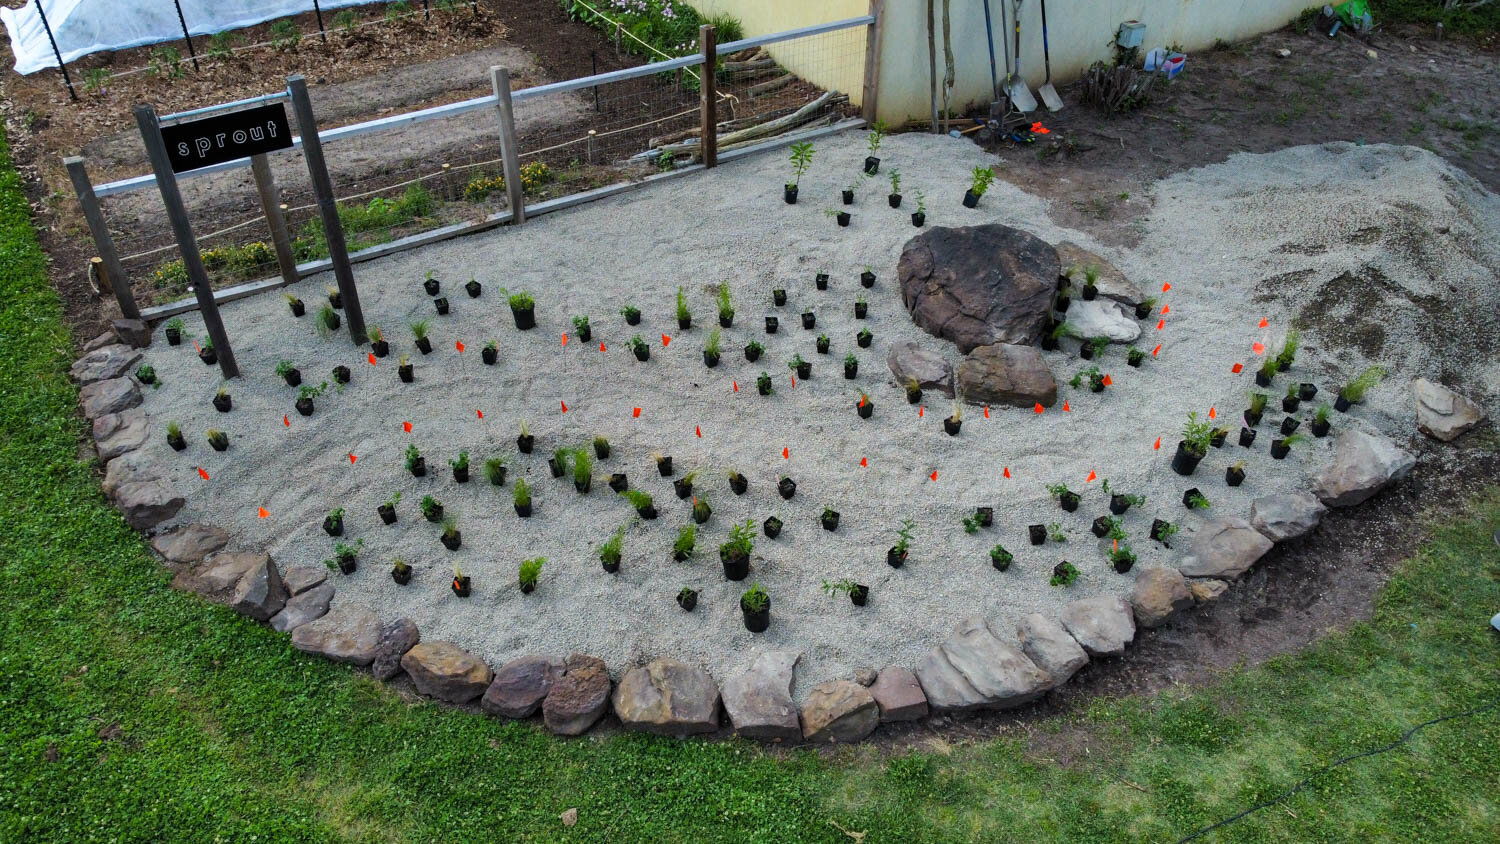
The gravel garden fully planted!!! Yay!!! We still haven’t decided what edging to use to mark the path. We may wait until the plants fill in a bit to determine that. We are thinking willow, bent metal, or maybe just leaving it bare.

An overview perspective of our new gravel garden. And, in case you are wondering about the area to the right of the gravel garden that’s been recently cleared, we eventually want to turn that into a practice patio garden where students can overhaul it every few years. Since we are a small program with limited funds, we tend to piecemeal projects together. This gravel garden pathway will feed right into the space as if it is part of an extended back yard to the mock patio.
As Jeff Epping suggested in his presentation, we will irrigate often for the next several weeks until plants are established. And, reflecting back over the whole process the one change I want to make is to try to find cheaper gravel that achieves the same effect as this baked clay product.
I look forward to seeing the true grit that these plantings will offer for us here in the southeast. I asked students what they loved most about this project. Common comments were how good it looked at the end, learning that plants could grow in gravel, and the excitement to see how the planting will look in a few months. I, too, have that same excitement, though with a dash of the fear of failure. But, I know that failure feeling is essential when trying something new that pushes the boundaries of what is possible and learning new things about horticulture. And, as I kidded with the students, should this fail, well, we have 6 cubic yards of gravel for our future walkways! :-)


