What is it that makes gardens like the Lurie so alluring? Dr. Jared reflects on this incredible naturalistic planting from the Perennial Plant Association Symposium earlier this summer.
Read More
PPA 2019: North to Northwind Perennial Farm
Dr. Jared reflects on his visit to Northwind Perennial Farm and the wisdom Roy Diblik shared about perennial plantings.
Read MorePin the Plant on the Triangle
This semester, one of the classes I’m teaching is herbaceous plants, and I’m taking the class beyond the usual discussions of annuals and perennials. From studying herbaceous plant communities, one of the most useful concepts that I’ve learned in recent years is the classification of a plant’s survival strategies.
I’ve written about it before here and here. As a refresher, Grime pitched that plants had three strategies based on environmental factors.
COMPETITORS are plants that take advantages of any and all resources they can muster. They grow tall and wide to take out the competition. Usually these stalwarts are perennial in nature, and they grow where stress and disturbance are nil.
STRESS-TOLERATORS are plants that have adaptations to ensure survival when stress arises and conditions deteriorate. They are usually perennial and can take many years to flower from seed.
RUDERALS are short-lived annuals or biennials that are frequently exposed to some type of disturbance, which has selected for plants that quickly produce seed.
Usually, this strategy is visualized using a triangle (much like the soil texture triangle!) where a certain species can be shown to be—pulling some numbers out of the air—say, 70% competitor, 20% ruderal, and 10% stress tolerator based on the characteristics they exhibit.
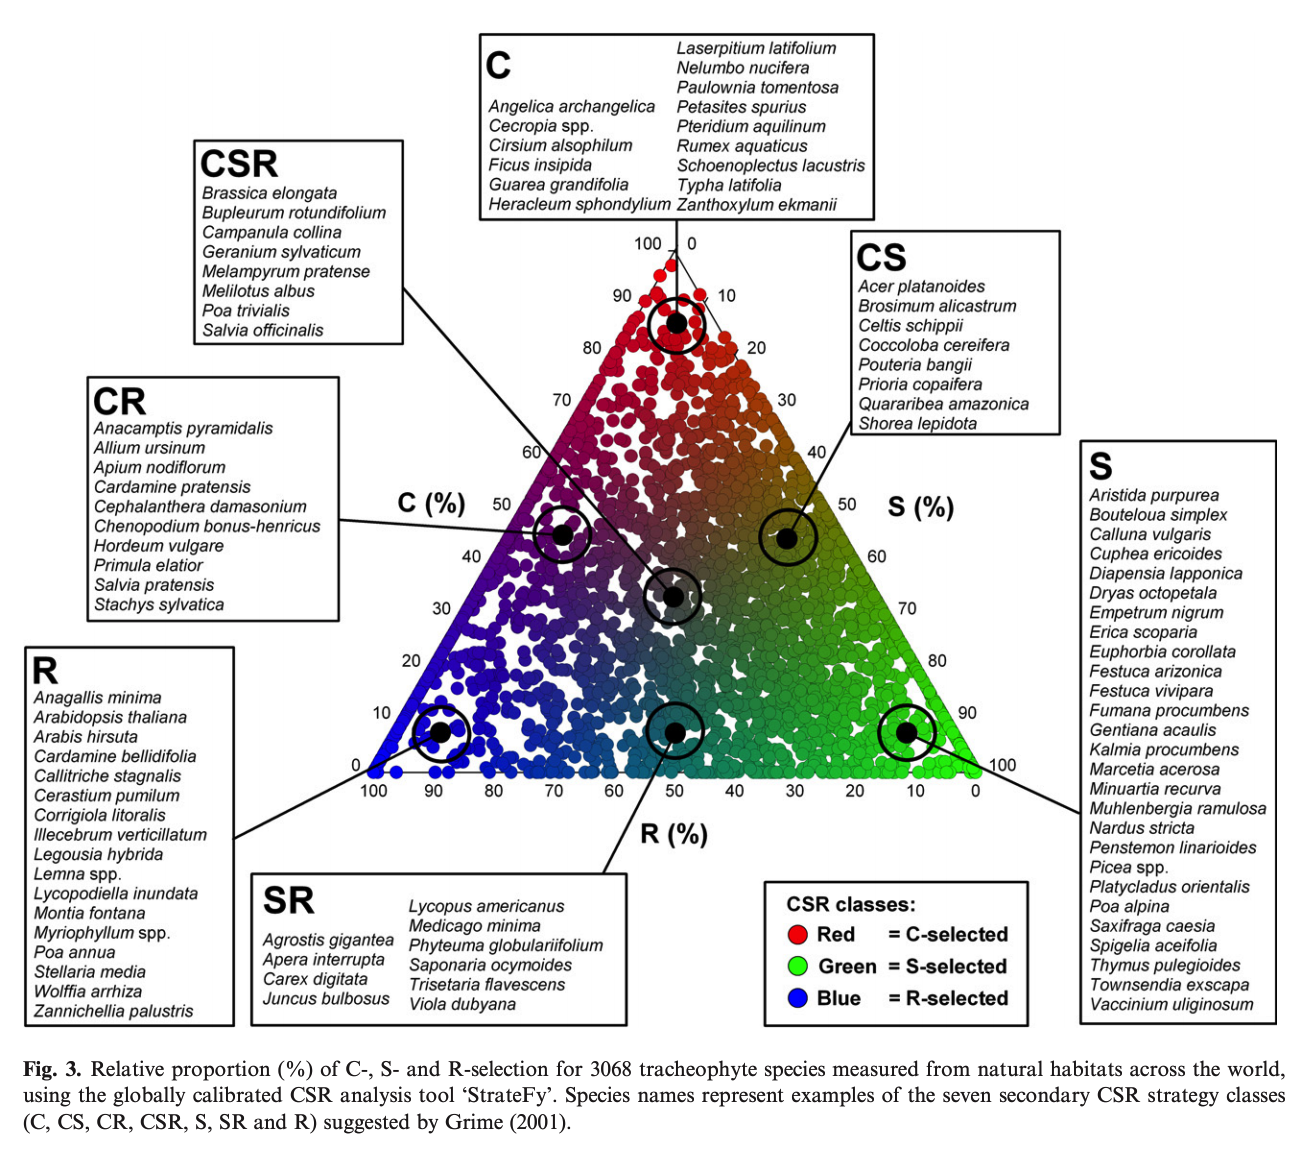
A figure of Grime’s triangle from Pierre et al. (2017) titled A global method for calculating plant CSR ecological strategies applied across biomes world-wide. As you can see the authors attempted to classify plants across the globe based on their tendency to be a competitor, stress-tolerator, or ruderal.
How do you take this concept from theory to application for students? Much research and data collection is needed to be able to precisely place a plant on the triangle. Can it be done in a more simple fashion?
After we covered the CSR theory in class, I did an activity with students. I gave small groups (three to four) a list of seven different herbaceous plants and asked them to look up information and pictures online and try to determine where on Grime’s triangle it would fit. I drew a triangle on the board labeling the sides and gave them markers and half sheets of paper for writing plant names.
I then challenged them in pin-the-tail-on-the-donkey fashion (no blindfolds or sharp objects though!) to figure out where on the triangle the species would go by searching for it online. Students looked for tendencies to spread, cover large areas, form large clumps, and/or have rhizomes (COMPETITOR); tendencies to produce copious amounts of seed, occur in areas of disturbance, and/or be short lived (RUDERAL); and tendencies to live in a stressful habitat, take a long time to flower, and/or have storage organs (STRESS-TOLERATOR).
One by one they started coming up and making educated guesses. I stood by the triangle to offer advice and suggestions. Some hit the nail on the head while others needed a little bit of coaxing to the right place.
At the end, we went over the 20 or so species I provided as a challenge. Again, I explained that while some species neatly fit into one group, some straddle the fence like Liatris elegans. It has a corm (a stem-derived storage organ indicating some level of stress toleration) yet produces copious amounts of seed (traits of a ruderal).

Pin the plant on the triangle—a fun game to teach students about plant survival strategies. Based on your plant knowledge, how do you think they did?
As gardeners it’s very helpful to think about flora in this way. It helps us anticipate how plants will perform. It explains why Gaillardia and Aquilegia don’t live long as perennials (ruderals), why Mentha and Monarda spread like crazy (competitors), and why Trillium and Narcissus take 3–7 years to flower from seed (stress-tolerators). It also allows us to envision how to combine plants. Maybe put that runaway competitor in a drier spot to keep it from taking over creation? Or, sow some ruderals in between the stress-tolerators to keep weeds down.
If students can decide approximately which section of the triangle plants fit in during a 15 minute activity using search engines, then we can by watching how plants grow over the course of a year.
So, that’s your homework for the season. Draw a triangle and see if you can’t plot where the species in your garden fit.
Mowing the Food Prairies
Today, we mowed the food prairies, our prototype herbaceous plantings at SFA. I was hoping to wait till January 22nd to have a lab the first week of class and teach students about mowing naturalistic plantings. However, with the warm weather the underplanted Narcissus × odorus had flower buds emerging from the soil. This problem is one I outlined in detail in a previous post.
I did get to show Anna Claire and Jevon, two of our Plantery student apprentices how mowing is accomplished. For clearing the vegetation, I was inspired last year from a video Austin Eischeid posted to just raise a push mower on the highest setting and rev it into action.

Jevon mows!

Anna Claire mows!

Some plants that lay over need to be pulled up to come in contact with the mower blades.
This year is our second mowing of the food prairies, and it went off without a hitch. It took about 40 minutes to mow 650 square feet, but that includes some down time to refill the mower with gas.
I prefer to mow when we can because the ground up residue provides a mulch that prevents weed growth for much of the rest of the growing season. Even late into the fall of 2018 I was able to find ground up grass clippings from the January 2018 mowing.

The finished product. Notice the nice layer of chopped plant residue. It is amazing to see 3 to 4 feet of biomass reduced to a few inches. The deep green clumps are Carex cherokeensis.
And, we were able to find Narcissus × odorus buds still intact after the cut. Mission accomplished.
Oh, and here’s a video from last year if you want to see the process. Yes, our students do really mow that fast.
Eragrostis, a Grass I Love
One of the perks about living out in the country is I have a delightful 20 minute drive into town to enjoy the east Texas countryside and keep abreast of the phenology of the local flora.
It was about this time last year right after moving into our new house that I was driving to work familiarizing myself with my new route when a plant sporting a glimmering haze on the side of the road caught my eye. When I actually had a chance to stop, I pulled off and identified it as Eragrostis spectabilis, commonly known as purple love grass. I enjoyed seeing the dew collecting on the panicles and the early morning light imbuing it with an ethereal character that would inevitably evaporate as the day aged. Most sprigs I saw were single, scraggly flowers that looked like the way a young girl might practice putting her hair up for the first time.
But, one clump was spectacular! It was full and lush, bigger than a basketball, and hard to miss in the fresh light of dawn. Every day I’d drive past it and admire that shimering plant against a shaggy fencerow.
I had to have it. Since I arrived in Texas in July of 2014, I’ve been hunting for short, groundcover species that will perform well in our area. Most plants I’ve tried are imports, but here was a species right down the road just waiting to have its potential realized. Being September, I knew that there was a chance it might not survive as many grasses moved in the fall don’t establish well. But, with love and care and some horticultural knowledge, there was also a good chance it would live.
With shovel in car one Saturday morning, I pulled off along the roadside and walked over to meet my new friend that I had been admiring from afar. The spade slid right through the sandy soil, and a few jabs and levers later the Eragrostis was up with a nice rootball still intact. Any guilt I had collecting the wild vanished a few weeks later when the mowing crews came along and sheared the roadsides.
Back home, I found a nice spot for the transplant in the catch-all herb bed of our newly formed kitchen garden. There, I could check on it every day and water it as needed. I was thrilled when I saw little discoloration the next few days from it adjusting to being moved. A few blades turned tan and purple, but overall the plant settled in nicely.

Even though it had a few bruises and browning after being transplanted from the roadside, this mother plant of Eragrostis has settled in just fine. You can see the speckled haze of flowers hovering above the foliage.
I loved going out in the mornings and see my new Poaceae pal wrapped in a crystal veil. The flower color is not as purple/pink as most of the examples I’ve seen in catalogs or online, which made me question it's identity. But, the height is right, it has knobby rhizomes, and the flowers match what I can find in dichotomous key photos. My guess is down south the color is weaker than our northern counterparts as is the case for many other ornamental plants in our sweltering heat. Or, perhaps this southern ecotype sports inflorescences that are a lighter shade of maroon? I tried another strain of Eragrostis spectabilis from further east a few years ago whose flowers were more pink in color, but our little trial of plants died. Perhaps they were in too wet a spot in too wet a summer? Or, maybe it wasn’t locally adapted yet? Not sure, but this one I discovered has performed beautifully.

The typical rosy-colored flowers of Eragrostis spectabilis.

The clump I found and those that I've propagated have more of a light pink or tawny color in the inflorescence.
As September wore on, the panicles started to mature. I collected some seed, and sowed them on a whim. To my amazement, they started germinating within just a few days! No stratification or even dry storage required. For those that need a review from plant propagation, dry storage is the name of the germination delay that some seeds experience to prevent them from germinating too early or on the mother plant.
Once the seedlings got some size to them, I took them to school and had a student pot these few up into a couple trays for our school garden beds. To my amazement, the disturbance in the pot caused even more to germinate! It seemed to good to be true. These little sprigs I brought home and planted into beds here at the house. As more of the original plant’s inflorescences began to mature, I collected more seed to become the stock for our plantings on campus.
Winter came with the worry of loosing the original clump, but this spring, I was thrilled to see new shoots emerging on the mother plant. Being a C4 grass, it was slow to get going, but when the brunt of summer arrived it erupted into growth. Eventually, I tried my hand at dividing the clump into about 20 propagules, and the majority of these survived. However, divisions do seem to grow a bit slower than those from seed. I was also delighted to discover a few offspring popping up around the mother plant. One even sowed its way into a crack in our pavement.
Now, a year has passed. We have hundreds that have been planted around the SFA agriculture building. And, back home a few that I transplanted carpet the ground in a portion of our herb garden. I’ve also planted it as the groundcover layer in the beds on the eastern half of the swale I’ve been building through our kitchen garden (more on that in a later post). What few perennials I plugged around these starts look like ship masts emerging out of a grass fog. The effect is similar to muhly grass (Muhlenbergia sp.), but the height is shorter. It would occupy more ground, but I ran out of plants here at the house and have to propagate more. No worries as it appears I’ll have thousands and thousands of seed in a month and Heaven knows how many seedlings next spring.

En masse this Eragrostis is spectacular, especially when covered with morning dew. Here, it is planted along the swale that runs through our edible patch. Next year, I expect more perennials to be established and piercing the floriferous fog.
I feel proud having moved it—perhaps I could go as far as saying saved it? And, I feel that joy every time I walk past the clumps. In the morning, strolling past the wet panicles reminds me of the plant perspiration Christopher Lloyd wrote about in Exotic Planting for Adventurous Gardeners. And, once the dampness vanishes, the flowers brush against your leg like a friendly feline.
This ecotype of Eragrostis will become a permanent fixture in our prairie plantings here at the house and on campus. And, why not? With a plant named love grass from right down the road that thrives in our climate, what’s not to love?
Echinacea Named Tennessee
Echinacea tennesseensis (Tennessee coneflower) is beginning to bloom in our SFA student garden here in east Texas. Plants that we started over two years ago as class projects have returned yet again and are flowering their little heads off.

I must admit, when Echinacea tennesseensis first bloomed I was amazed at how floriferous it was!
It's one of my favorite native wildflowers, but I'm a bit biased, being a native from the great volunteer state. You can easily identify this member of the aster family apart from the other nine or so species of Echinacea that are native to the US. Their inflorescences face east once mature, and the ray florets ascend to the sun instead of drooping like the petals on most other coneflowers. This plant embodies such a great metaphor for life. Start every day gazing at dawn and reaching toward the sky; I can get behind that. Or, in front of that I should say as this trait does force us to consider where to situate it in gardens. It must be planted on the eastern flank. Siting it to the west will cause you to only see the backstage of the inflorescences and leave you unable to enjoy the full performance.

Can you spy the east-facing Echinacea tennesseensis 'Rocky Top' in this incredible planting at Chanticleer's elevated walkway? Hint, it's on the right. Compare these blooms where the ray florets curve upward with the typical Echinacea at the back left of the image whose outer rays droop.
Of course, it's a bit of a miracle that we still have this delightful perennial with us. Tennessee coneflower is only found in a few counties in Tennessee, and if heroic stewards hadn't stepped in to save it, our world would be less colorful. It was discovered in 1878 by Augustin Gattinger, and less than a century later in 1961 its absence in field surveys led some researchers to claim it extinct. Later in the 60's it was rediscovered; however, survival wasn't guaranteed as the land some populations inhabited was cleared to make way for trailer parks and housing developments. We have people like the late Dr. Elise Quarterman to thank for advocating for this species's livelihood. Efforts from her and others helped the plant become listed on the endangered species list, one of the first flora ever. This attention led to areas where Echinacea tennesseensis occurred being protected, and with enough populations safe, the species was delisted in 2011, certainly a success story for horticulture and humankind's intervention.
The endemism is a peculiar subject. Why is such a floriferous species isolated to just a few counties in Tennessee? Sure, humans destroyed a few sites, but it seems that it never had the wide distribution that some of the other Echinacea genera enjoy. The current hypothesis is that the species arose during the hypsithermal interval, a period of climatic warming and drying that occurred around 5000—8000 years ago. Drier conditions opened the woodlands of middle Tennessee and allowed the colonization of prairie species like our Echinacea. When the climate cooled and became more moist, forests began to reclaim the land, and this stress-tolerant species began to decline in numbers. Walck et al. (2002) state that its narrow endemism is due to several factors—seed-based reproduction; large seeds that aren't animal or wind dispersed; self sterility; intolerance of shading; a lack of seed persistence in the soil, and few individuals making it to adulthood in the wild. All these characteristics would have limited its dispersal from middle Tennessee.
The xeric-adapted nature of established plants is quite apparent in the root systems. Earlier this spring I had to move some Echinacea tennesseensis, and I was very surprised to discover massive, deep taproots on plants that were only one year old. Unearthing knowledge about roots (in a literal and figurative sense!) is always exciting, like discovering buried treasure. I expected to see more rhizomatous roots like those on Echinacea purpurea (purple coneflower) that I've transplanted much of my life . The soil had mostly sloughed off one taproot, so I rinsed it to get a better look. Near the crown it was as thick as a plump carrot! From there, the chthonic organ divided with depth, but the roots were still stout. (Yes, most of the transplants survived in case you are wondering.)
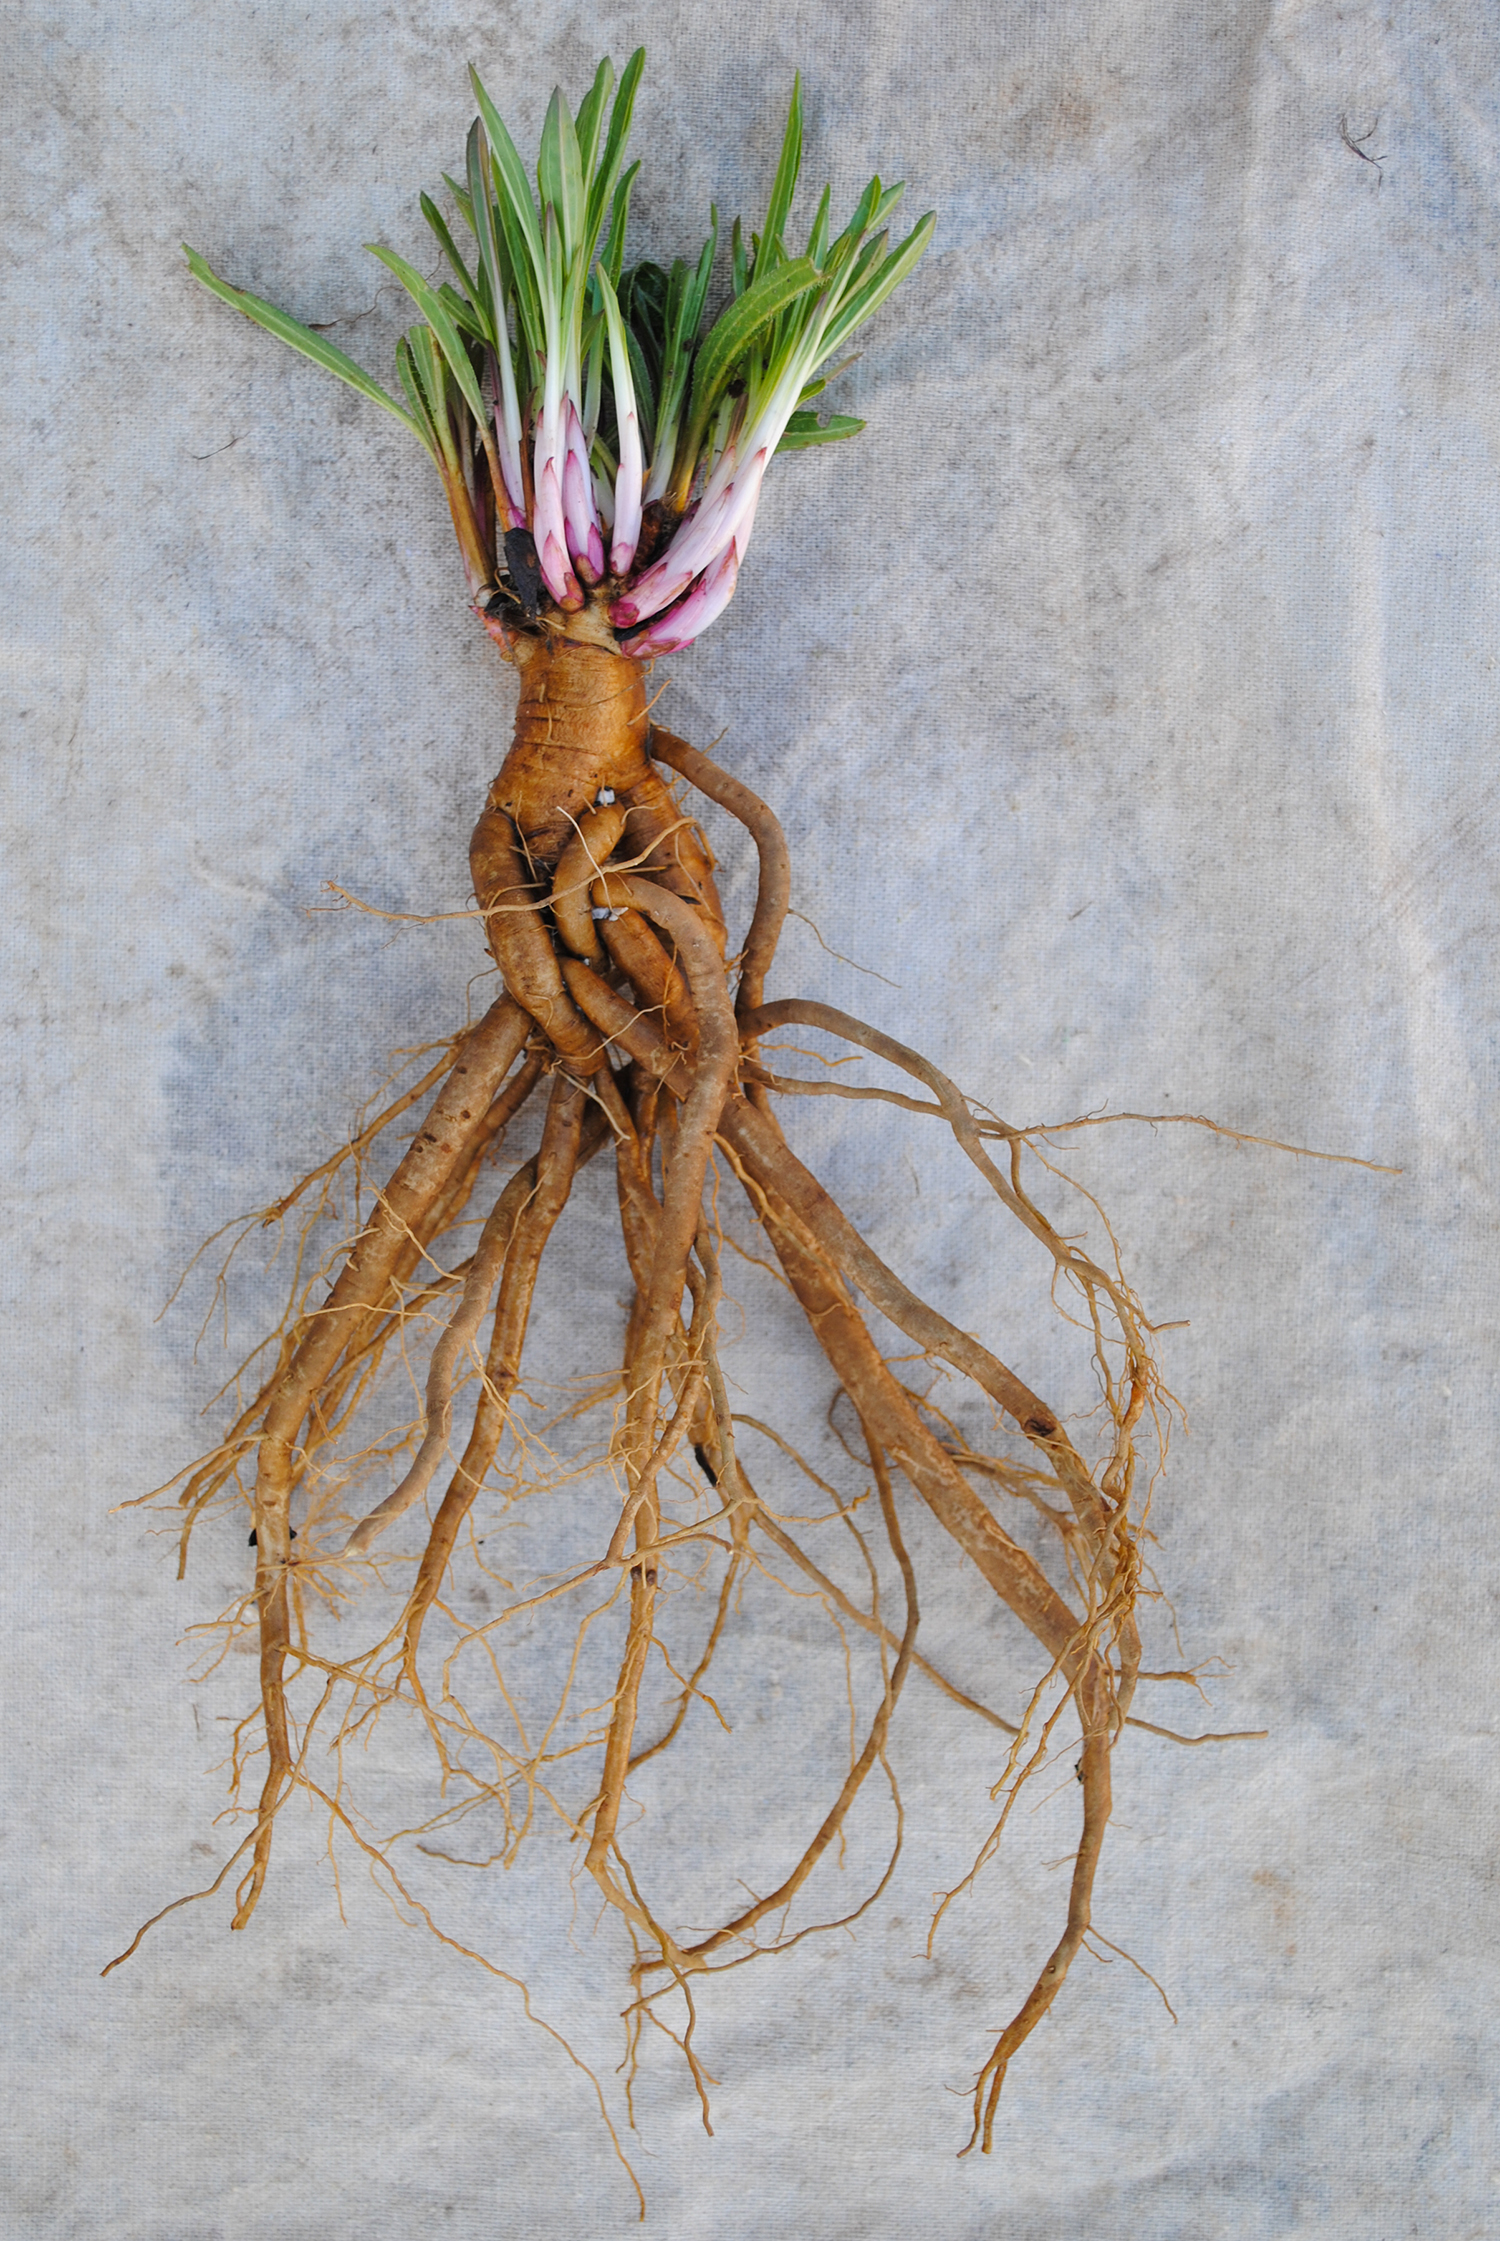
I learn so much each time I expose roots. Here, plump taproots on Echinacea tennesseensis likely help the plant survive stressful times during the year and store resources for the coming bloom.

A close up of the crown of Echinacea tennesseensis. The pink tinge in the lower wrapper leaves are hints of colors yet to come.
I'm already applying this new anatomical knowledge to our propagation culture. This spring, we currently have over 10 deep-celled propagation trays of Echinacea tennesseensis that my student team has grown. Seeing the deep taproot was insight to not keep the plants in the trays for too long.
While it is beautiful to see in the gardens, I hope one day to see this Echinacea named Tennessee in its provincial habitat. Perhaps at daybreak with their heads basking in the new glow of the day and me basking in the existence of such a great species for our plantings.
Mulch Happens
The other night a phrase in The Holistic Orchard by Michael Phillips stopped me reading mid-paragraph.
"Mulch happens."
I was surprised because I feel like horticulture is moving away from wood mulch with the interest in mixed plantings and covering the ground with plants. Or, at least with that desire in mind (like here and here) if we all aren't quite on board yet.
The action of mulching just isn't sustainable. Depending on dead organic matter to prevent weed growth around perennials in place of living plants is a fallacy that will have to constantly be remedied. It is Sisyphean task. Hardwood mulch also doesn't naturally occur, except maybe under a fallen, decaying tree. As Thomas Rainer says, you won't find mulch circles in the forest.
So, does mulch really happen as Michael wrote? To make sure that I'm not taking the quote out of context, here it is in full: "Nature builds soil from the top down: Leaves fall, tree limbs decay, mulch happens.
In the sense that we are used to seeing hardwood mulch strewn across the landscape, no . We do have an organic layer present in most soils, but it's not a few inches thick of hardwood. Instead, it's dominated by a mixture of the abscised and the fallen, the green and the brown, the leaf and the stem.
Michael wrote that when he mentioned mulch he was not talking about recalcitrant hardwood mulch that takes years to decompose. Instead, he was discussing ramial wood chips, a type of organic matter that comes from branches and stems that are less lignified and higher in nutrients. He advocated applying these wood chips in random patches throughout the orchard to feed the soil. His approach is to chop stuff up and then dump piles of it around his fruit trees. They don't form a solid cover, which encourages grasses and other forbs to grow to create a multiculture. He stated most fruit trees originated along ecosystem edges. Introducing rough, slowly decomposing organic matter helps to improve the soil similar to these plants' native habitat. While I haven't studied the use of these ramial wood chips much but want to learn more, the logic behind their use seems sound.
What I think is fascinating for these perennial cultures—mixed plantings and the use of ramial wood chips in orchards—both schemas ask the question how can we emulate nature and try to enhance the biological systems already in existence, especially with covering the soil. In both cases mulch happens, just not the way that we traditionally think about mulch.
Planting the Food Prairies
This post is part 2 of 2 of a series where I reflect on our food prairie design and planting in the Sprout garden. I hope it inspires you.
18 APRIL | TUESDAY PRE-CLASS 7:30–9:20 Am

The blank slate of the food prairies! How exciting!
I arrived the morning of planting at 7:30 am to set up for my Herbaceous Plants class that would help to install the food prairies as part of their class project. Hunter, one of my incredible student apprentices, prepped the food prairie beds the week before. He had cleared them of any debris and small weeds, broadforked them, and then leveled them. They looked fresh and ripe for planting in the glow of sunrise.
The first task I tackled was to mark and string the boundaries for our planting grid in the prairies. The inspiration for this tactic was a photo I saw online of one of Piet Oudolf's installations where a massive grid system was laid on the ground. In Illustrator, I had overlaid the students' design with a grid that partitioned each food prairie into eight 4' × 4.25' quadrants and then printed each species layer. This paper grid would correspond with the one I was hammering into the ground to simplify plant placement for the students. I printed several of these so that the students could use them as guides. I installed stakes to mark the intersecting lines and used twine to demarcate the boundaries of our quads. John and Rock, two other amazing student apprentices, arrived just in time to help with the stakes and string. We outlined two of the four prairies for a demo before it was time for class to start. I had students in class help on the other two.

The food prairie design for the structural layer (plants listed above the design) and seasonal filler layer (plants listed below the design) is a kaleidoscope of color. Here the four quadrants separated by thick black lines are shown together instead of as their separate beds for ease. Circles approximate—and let me stress approximate as some species will spread—the final plant size.
The other thing I did before students arrived was place stakes with species names on them in the garden. That way, when students brought the trays up to the garden, they could put each species in its corresponding place. The labels helped us be very organized as I knew trouble finding small plants or accidentally grabbing the wrong plant could cause chaos.
18 APRIL | TUESDAY CLASS 9:30–10:20 am
I knew it would rain. I had been planning the food prairie install for a year and a half, and the reoccurring fear I had was that some stalled front would dump 10 inches on us all week.
I walked into the classroom to get the students, and the minute we walked outside, the wet stuff began to fall. It wasn't a monsoon. More like a light shower, barely above a mist. However, the students didn't complain besides the occasional, "I'm cold."
I sent a few students to get the plant trays, and I stayed on Sprout hill to help others begin laying out the stakes and string. Most everything we planted was either a 3.5 inch pot or smaller save for a few species that we dug and divided.
Once the grids were finished, I began to show students how to read the plans from our design. I indicated that a plant needs to go roughly where it was on the design in its appropriate grid, but to the exact inch was too tedious. Piet Oudolf and Noel Kingsbury say in Gardens in Time and Space location matters less than the plant pallete as these designs can and will change over time.

The food prairie grid and food prairie design for Symphyotrichum oblongifolium 'Raydon's Favorite' (aromatic aster). The red, purple, green, blue, and orange circled plants on the left correspond with the circled plants in the design on the right. As you can see from the plant placement on the left, students were very adept at finding each propagule's final spot.

Plants goin' in the ground!
I also told the students to not walk on the beds. I knew with around 20 species to install and 12–14 students helping there would be lots of soil compaction. Therefore, I encouraged them to use stepping stones as landing pads. I must compliment them. They were very diligent about caring for the soil, even when I wasn't looking. :-)

These plastic stepping stones helped us prevent excess soil compaction.
Since the class was only an hour, we did a trial run installing two species. The rest would wait for lab. I was immediately impressed with the students' collective ability to read and interpret the plan. They worked in pairs and helped each other find where plants went.
18 APRIL | TUESDAY LAB 1:00–2:50 pm
For lab, we were able to hit the ground running since the grids were in place and most of the plants were on site. I made comments about it not raining, to which some of the students griped that I was jinxing us all! Fortunately, it didn't rain another drop for the whole project.
We started by digging a few structural-layer plants like Asparagus officinalis (asparagus) and Rudbeckia maxima (great coneflower) we propagated in the ground for the install. At first, I checked the students work against our design, and once I saw they were able to follow the design, I let them work on their own. Overall, we were able to install 13 species today, and we got the majority of the structural and seasonal filler layers installed.

The chaos of creation

Teamwork makes the dream work.

Photo from the end of day 1. From this overhead shot of two food prairies in the midst of our cut flower and vegetable beds you can appreciate how the grid system helps students visualize where plants go.
20 APRIL | THURSDAY CLASS 9:30–10:20 am
This morning, we continued to plant other components of the seasonal layer. We also started planted dynamic fillers like Gaura (Oenothera) lindheimeri 'Sparkle White' (Lindheimer's beeblossom), Oenothera biennis (evening primrose), and Gaillardia aestivalis var. winkleri (Winkler's firewheel), and I had a few students start plugging in Carex cherokeensis (Cherokee sedge) that would comprise the groundcover layer.
After I got them started, I climbed on top of the building and sneaked a few aerial shots.

Hehe, they didn't even know I was on the rooftop for a while.
From the rooftop, I saw Donna McCollum of KTRE filming students planting, and I came down to greet her. I was excited that she came out to feature these perennial projects our students were installing at SFA. Plus, the students were planting these garden beds the week before Earth Day, and they were able to discuss the sustainability of the plantings for the clip. She asked me some questions, and then she interviewed several of the students. Here's her segment if you'd like to watch.

A rare photograph of me teaching as Donna McCollum films a piece on the food prairie plantings. Photo by Hunter Walker.

Donna McCollum of KTRE interviews SFA Horticulture student and Team Sprout member Hunter about the food prairies.
04/25 | TUESDAY CLASS 9:30–10:20 am
The food prairies were really becoming full of flora. Today, our main objective was the matrix layer—Carex cherokeensis, Bouteloua curtipendula (sideoats grama), and Sisyrinchium angustifolium (blue-eyed grass). At this point it was mainly filling in open spaces that we hadn't filled yet with other flora, and we mostly completed two of the four food prairies this morning. Also, towards the end of the hour, I had a student begin plopping Narcissus × odorus (campernelle) bulbs into the food prairies according to our design.

Bouteloua curtipendula plugs lay scattered in vacant areas in the food prairies.

Even a broken leg doesn't stop students like Cierra from helping plant!

Reagan smooths soil around Sisyrinchium angustifolium. The sun came out long enough for the plants to open their beautiful blue flowers.
04/25 | TUESDAY LAB 1:00–2:50 PM
We picked up where we left off this morning on the groundcover layer. And, just like that it was finished!

Wa-hoo! The food prairies are planted!
Or, should I say it's just begun since they will change and evolve over time?
Later in the week, a few of my student apprentices applied a thin layer of mulch to reduce weed germination. Of course, we want the plants to grow thickly enough to shade the soil so weeds won't have much of a chance, but this initial covering will help the installed plugs gain a solid footing.

Watering in the students work. We removed the grid overlay after the install was finished.
In the end I believe that this type of planting is great for students because of the randomness to it. They were very capable of following the design, and if they didn't put the plant in the exact spot, it's ok. In total with everyone's help, I roughly calculated that we invested approximately total 80-90 hours in the project for planting and installation.

SFA students happy to be finished and happy to have a positive impact on the world. The food prairies will add beauty to the garden and provide habitat for a number of beneficial insects.
Now, we wait and watch as the food prairies burgeon with growth.
Designing the Food Prairies
As a educator, I find the process of learning fascinating. Maybe even you've caught hints of the magic. When you're really passionate about a topic, it's like your brain turns into a sponge as you soak up every drop of knowledge, and wring it all back out again to transform something, some surface of existence that needs a good scrubbing. Read and study all you want, but at some point you have to go and do.
Heaven knows that's me with mixed plantings. Probably since 2012 when I first heard Claudia West speak at PPA in Boston or 2013 when I travelled to the Netherlands with Piet and Noel's book in hand, I've been reading about designed plant communities and standing on the shoulders of giants as I've accrued knowledge from those eager to share their craft of interpreting nature.

I made a special point to visit this park in Leuvehoofd in Rotterdam at a conference in the Netherlands a few years ago. It was the first Oudolf installation I ever saw, and it was enlightening seeing plants intermingled.
I wanted to do something with all I had absorbed. Since 2015, I have been working on designing mixed plantings in the Sprout garden at SFA that we've deemed the food prairies. Like I shared in a previous post, I wanted to have these plantings in the Sprout garden because of the benefits—they would add beauty to the garden, they would help to attract beneficial insects, and let's be honest, I love the prairie-look. AND, I wanted to teach and educate our students about the design, the installation, and the management of these style of plantings. Much of the work on synthesizing these planting combinations has been done in the north or abroad, and we need to adapt the methodology for the southern US.
I started by drawing and iterating several different designs for the food prairie beds. The design that won was to have four beds, two on either side of our primary axis path totaling a little over 600 square feet of planting space. The plantings would be in-between our food growing areas, thus dividing the garden into thirds. I was inspired by Piet Oudolf's work at Scampston Hall where Deschampsia cespitosa (tufted hairgrass) segregated patches of lawn. This design resonated with me, perhaps because most of my life I grew up around fence rows that partitioned the landscape. Additionally, our mini fence rows amplify the reclaimed farm theme I'm going for around the SFA agriculture building.
Decisions on plant material came next. Initially, I considered adding a few shrubs, but after reading Planting in a Post-Wild World, I nixed them. Thomas and Claudia argue that open spaces like our full sun slope call for the grassland archetype and herbaceous species should dominate. Additionally, woody material would likely dominate the space, and the absence of shrubbery would aid maintenance and early season clean up with our student apprentices.
Since my arrival in Nacogdoches, I documented when species were in flower and how long their ghosts persisted in the landscape. I had a steep learning curve to climb as the flora of Texas bloomed a month or two earlier (or later in the fall!) than where I lived in Tennessee or North Carolina.
In the fall of 2015, the students and I installed trial material from Hoffman Nursery, Intrinsic Perennials, and Jelitto to see which species would fare well. Since we were overhauling the entire garden, I decided to grow them on site. These evaluations helped to lengthen the plant list that follows, especially for the species comprising the matrix.

The list of species for the food prairie that I would eventually share with my students. L = leaf, F = flowering, and S = seed or senescence. Overall, colors *roughly* match the species, but white was coded as gray so that it would be visible on a white background.
Early on in the design process, I knew that the installation would be perfect for my Herbaceous Plants class slated for the spring of 2017. Many regale this type of planting as the future of horticulture in urban areas, and I'm not going to have my students left in the dust.

SFA students in Herbaceous Plants learning how plants grow in nature. Exciting times!!!
I began developing curriculum to teach the concepts of mixed plantings. For our first lab, I took an idea that Angela Treadwell-Palmer shared with me that she did in school under W. Gary Smith—take students out to observe how plants grow together in nature. They got to see the patchwork quilt of flora and how plants actually grow in the wild—randomly following environmental gradients, arranged in layers, and sans mulch but smothering the ground with foliage.
Also, early in lab we began propagating plants for the food prairie to allow them time to grow and develop for our late April install. Stock plants of Pycnanthemum tenuifolium (narrow-leaf mountain mint), Symphyotrichum oblongifolium 'Raydon's Favorite' (aromatic aster), and Allium tuberosum (garlic chives) were ripped apart by green fingers, and the divisions grew to the surprise of a few students. And, Echinacea cultivars (purple coneflower), Oenothera biennis (evening primrose), and Achellia millefolium (yarrow) seed were sown and germinated promptly.
In class, we discussed concepts about ecology to reiterate the growth patterns plants exhibit in nature like survival strategies, succession, and colonization. We covered mixed plantings, why this approach is becoming more prevalent, and how to do it. We covered the layers—structural, seasonal filler, matrix, and dynamic filler. And, then I had the students design and develop a small modular design much like Roy Diblik presented in his book The Know Maintenance Perennial Garden. One student even went as far as developing a module where she used the ten digits in the number pi to arrange her 10 species in her module. (Great example of soaking it up and wringing it out, eh?)
After we covered all this material, we set about in lab designing the food prairies. I created a 1 in = 1 ft scale drawing showing the four food prairie quadrants, and had students cut out 1, 2, or 3 inch squares to correspond with the rough maximum plant size each species would get. On these squares students used markers to color and code an abbreviation for each species. Then, they came up and added them to the drawing, I voicing advice all the way about which plants would look good together and which ones for which layer. Once we were finished, I photographed the design and imported it into Adobe Illustrator where I overlaid the squares with circles.

Students in Herbaceous Plants plan and arrange the structural (left) and seasonal theme (right) layers for the food prairies.
I'll admit the first time we did this I encouraged them to put WAY too many plants on the design sheets. I had to cull some of the squares they placed but, by the end the numbers closely matched the design percentages from Planting in a Post-wild World and notes I took in a Cassian Schmidt talk.
I showed students the final design, and we set the week of April 17-21 for the install.
— CHALLENGES —
While I did much prep in the year and a half prior, the biggest challenge I faced was cramming the design and synthesis of mixed plantings into a 3 month period, from the first day of class to the install. Doing a design by yourself is testing enough, but try organizing things well enough to have 12 other people help! It's a whole 'nother endeavor. But, the teacher in me enjoyed it and reveled at the light bulbs going off in class and lab as I exposed the students to the full gamut of the design and install of mixed plantings. I didn't want to give them a fish; I wanted to show them how to use the bait and tackle.
I'll also admit I had fears, which I've learned is common when you make the shift from traditional plantings to this novel approach. Fear of failure. Fear of the unknown. Fear of weeds. Fear of too many plants being used. Fear of too few plants being used. Fear of the propagules not being big enough. Fear of this planting not being in my backyard but other there for the world to see.
But, as most things are in life, if you don't have angst doing a project and you don't feel resistance, it probably means the task is not worthwhile.
Now with all that we've learned, let's go plant it. The install, Part 2, is coming soon.
A Pioneer in the Smokies
The Smoky Mountains are a magical place for me. Always have been. Always will be. Probably once or twice a month I have dreams where I'm driving along the twisted roads or hiking the fabled trails. It's my parents' fault. They took my sister and me there when I was nine, rolled down the window, and herded clouds into the car on the high mountain tops. I was hooked.
I like to visit the mountains once a year or so, and last spring, Karen and I planned a visit to the Great Smoky Mountains National Park over my long Easter break. I, of course, started searching for great places to see wildflowers, and reports for Greenbrier suggested it was peak for early spring bloom.
Greenbrier is no stranger to me. It's one of my favorite places to visit. When I was in grad school in Raleigh and met my family for a long weekend in Gatlinburg, I'd always pass Greenbrier on Highway 321. Sometimes if I was a bit early, I would stop and say hi to the craggy creek.

The Little Pigeon River gurgles through Greenbrier.
For this visit, we would be staying a bit longer in Greenbriar to hike Porters Creek trail. I had seen pictures online of the Phacelia fimbriata (fringed phacelia) in full bloom, and the effect looked incredible, like a carpet of white wildflowers in the woodlands.
We parked for the day along the car-crowded road, which suggested we wouldn't be alone for the hike. We walked for about an hour passing old stone fences and traversing mighty hemlocks. We hadn't seen many flowers in bloom till we came to a narrow bridge.

The narrow bridge along Porter's Creek trail. Hikers provide a sense of scale.
However, once we crossed over, it felt a bit like entering Narnia because suddenly we were surrounded by snow!

Where's the lamppost?!
Ok, green and white snow. But, it was everywhere!!!

Phacelia fimbriata o'er hill and dale
And, it continued for about a quarter of a mile. It was breathtaking to see so many of one organism en masse.

A moss-covered log rests in a blanket of Phacelia
Some of it even grew on rocks.

Fringed phacelia thrive on a boulder, no doubt supported by a layer of detritus and abundant rainfall during the winter and early spring.
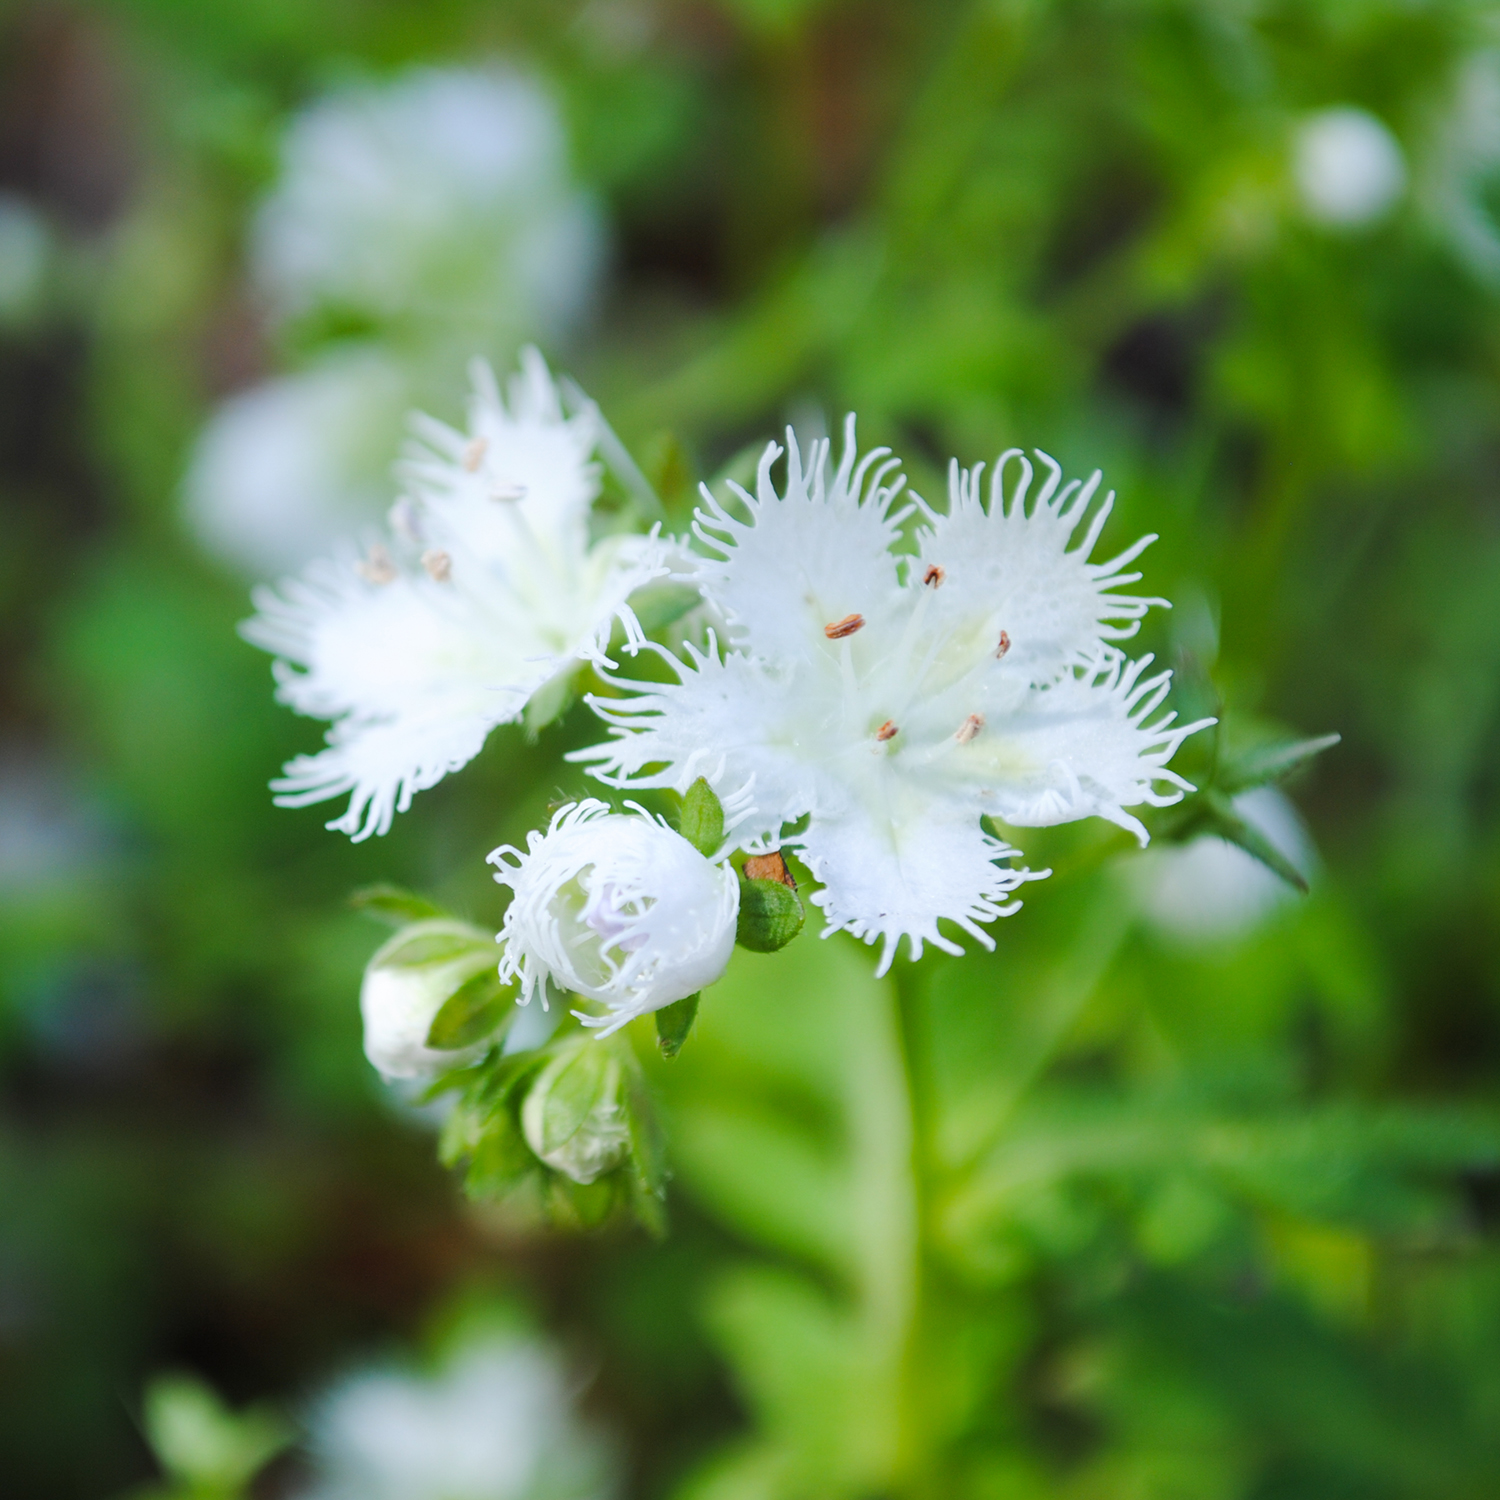
A close up of Phacelia fimbriata. The flowers were about the size of a dime.

Much like footsteps on fresh fallen snow, a trodden path manifests through the Phacelia.
In horticulture design we discuss how the effect of repetition is calming and creates harmony in the landscape. In fact, just a few weeks ago I shared with my class that seeing the same plant used multiple times in the landscape creates a sense of comfort. Much like when you travel to a foreign place and see familiar logos or icons.
So, why so many of one organism? No human planted this monoculture. This is nature.
From my environmental biology background, I learned to ask the question why does a species grow this way? There have been efforts to classify plants based on their survival strategies, and Grime's universal adaptive strategy theory groups plants broadly into three different categories.
COMPETITORS are plants that take advantages of any and all resources they can muster. They grow tall and wide to take out the competition. Usually these stalwarts are perennial in nature.
STRESS-TOLERANTS are plants that have adaptations to ensure survival when stress arises and conditions deteriorate. They are usually perennial and can take many years to flower from seed.
PIONEERS (aka RUDERALS) are short-lived annuals or biennials that are frequently exposed to some type of disturbance, which has selected for plants that quickly produce seed.
Like most human-made models, plants don't fit neatly into these classifications. Most plants are a blend of at least two strategies, much like you see below.
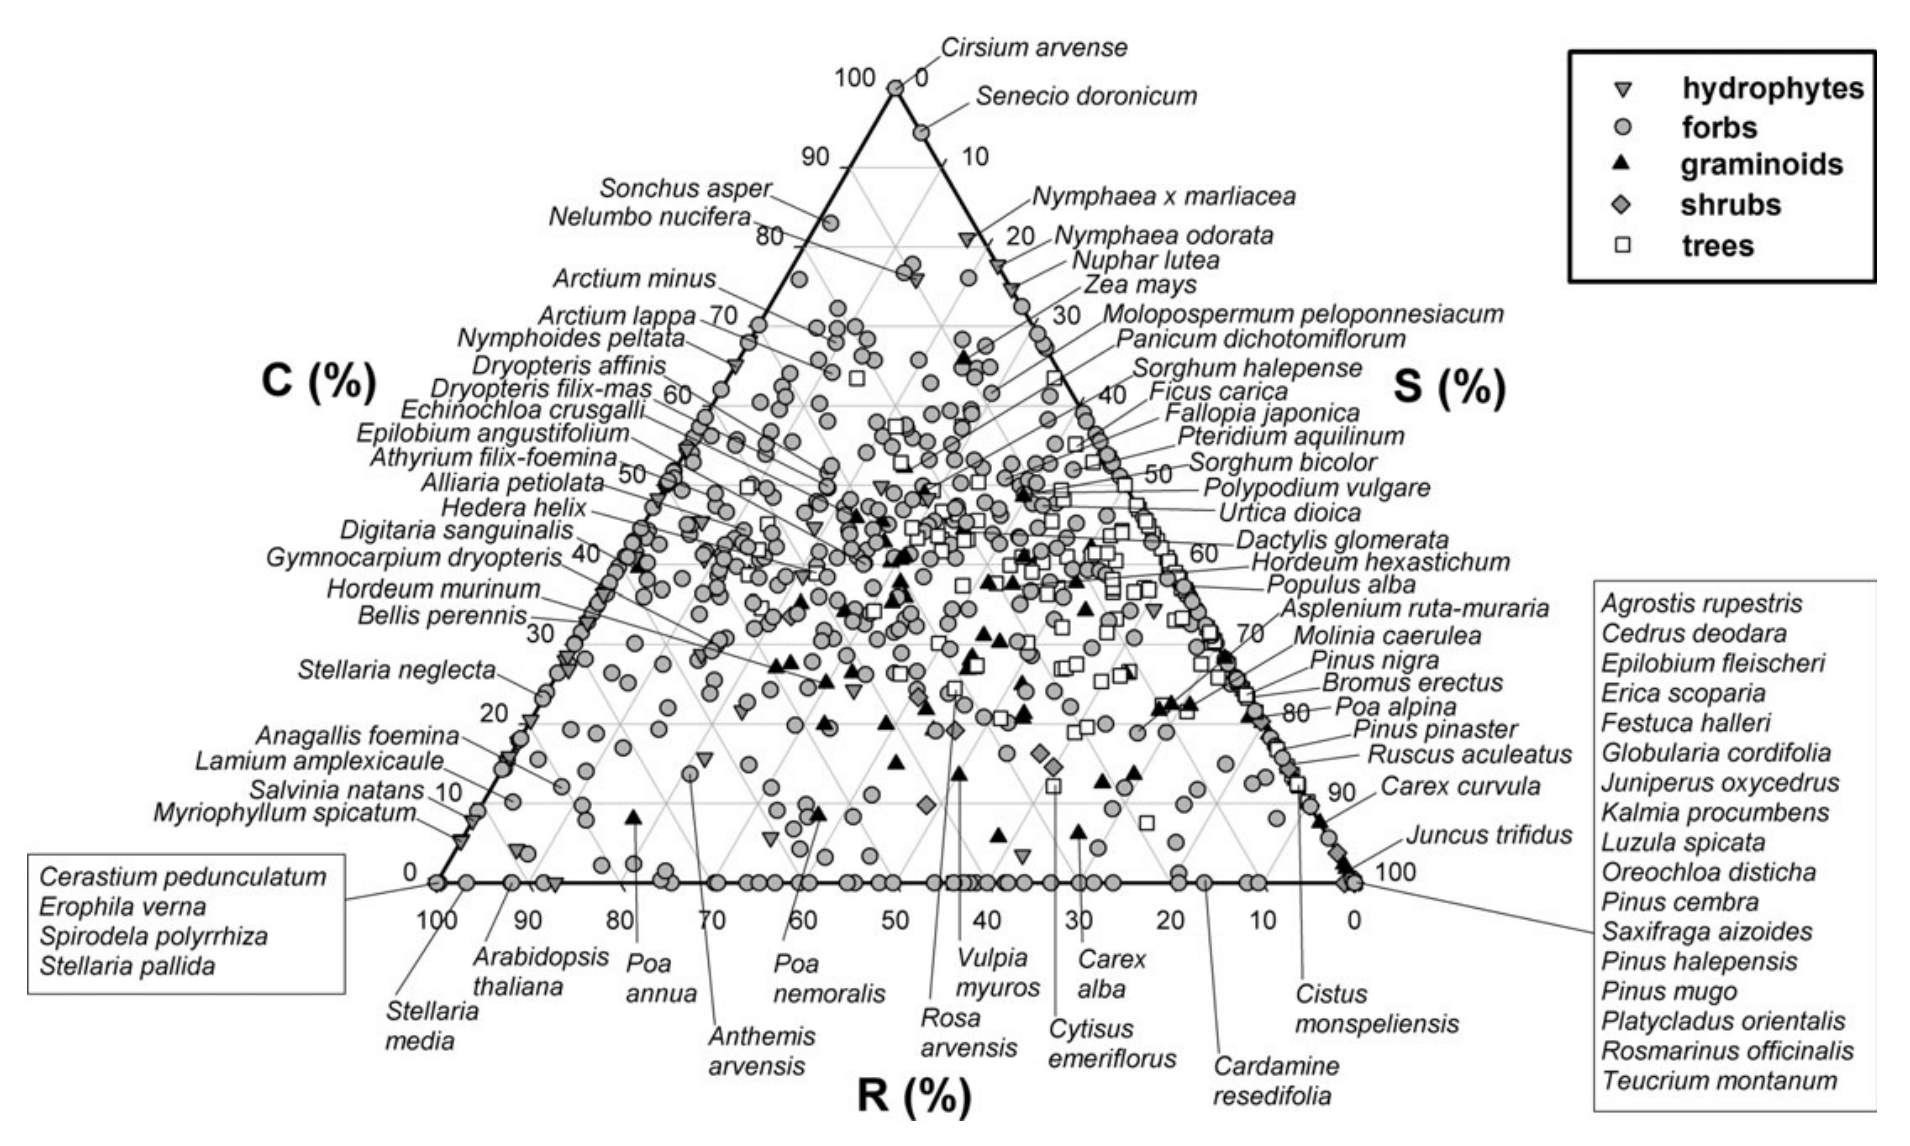
This figure from Pierce et al. (2013) illustrates how one can classify plants as competitors, stress-tolerant, or pioneers/ruderals. The placement of the symbol equates to what percentage of each strategy each plant exhibits.
But, thinking about these survival strategies can help us anticipate how plants will perform over time in our gardens. They help us understand why stress-tolerant Trillium can take several years to flower from seed, or why pioneer Gaillardia can die in our gardens after a few years. (If you want to read more about Grime's theory, might I suggest Planting in a Post Wild World by Thomas Rainer and Claudia West and Garden Flora by Noel Kingsbury).
In the case of the Phacelia that surrounded us on Porters Creek trail, we were looking at a pioneer-type species based on its short life span and the sheer abundance of plants. Phacelia fimbriata is a winter annual. It germinates in the fall, flowers the following spring, and dies after spreading seed. It also takes advantage of the full sun that filters through the barren canopies during winter and early spring.
This environment doesn't match my traditional concept of a pioneer species before I learned of Grime's theory. I usually associate pioneers with species that come in and colonize an area after all vegetation has been removed, and yet around us were towering trees clambering toward the climax community. But, as Larry Weaner and Thomas Christopher discussed in Garden Revolution, sometimes disturbance only affects a layer of vegetation and not all plants are removed.
As I began to ponder what disturbance the Smokies get, my mind immediately went to the horrible wildfires that ravaged Gatlinburg this past fall. Research in the Smokies has shown that fires on average have happened once every 5 to 7 years between the early 1700's to about 1930. If this pattern was the same for millennia before, it's easy to see how this species evolved to survive frequent disturbance.
We also encountered a few other spring ephemerals along our hike, and many were like old friends. I hadn't them seen in a while, but they still brought a smile to my face.

Dicentra cucullaria (Dutchman's breeches). See the hole? Looks like someone forgot to patch their pantalones before hanging them out.

Trillium grandiflorum in all its grandeur.

The freckled petals and coffee-colored stamens of Erythronium umbilicatum (dimpled trout lily) are a delight in spring.

Anemonella thalictroides (rue anenome) occasionally dotted the forest floor.

I assumed before we went that we would see Sanguinaria canadensis (bloodroot) everywhere, but I only saw one in flower. It was actually right as we were coming back to the parking lot.
Overall, Porters Creek trail was a great hike, and we both enjoyed the beauty of the spring wildflowers. But, the wildflowers weren't my only goal for the trip.

I also had plans to propose to Karen the next morning after the Gatlinburg Easter sunrise service. She said yes, and the Smokies became even more special for the both of us.